nav2

Tuesday, March 1, 2011

Blender vs Zbrush on normal maps

I've been juggling a number of projects lately. The animation on piggybank has been in the background and I haven't done much work on it since the last post. The models for the moCap project are ready now and this article will focus on the technical side of things as normal maps are concerned.

There is also a freelance job (a short 2d animation) that took some priority- I just want to make sure it ends up looking very good. :) I wont go into detail about it right now, as it wouldnt be professional to discuss it in early stages, while the client is very much deciding on how it progresses. I am not the type who would release anything I'm working on without the client's permission.

Anyway, onto normal maps.
It has been my main interest since the first day I started using a 3d package. How do I get a LOT of detail projected onto a low poly mesh. And whats with that obsession with low poly stuff (!?) some might ask. Am I just being a cheap bastard here , with today's technology advancing so quick. :D
Let me state the obvious advantages of keeping your mesh low on polycount- use geometry only where you need it.
- your computer can handle the files, especially if they are part of a giant scene.The files can be used in real time rendering engines. The playback speed while animating is near normal- no need to playblast it a billion times- its a waste of time.
- you can edit the files faster- its easier to edit the overall shape (especially with maya), its easier to paint weights (skinning) when you dont have to deal with a lot of geometry= that equals faster workflow
- You need geometry only to define the silhouette of a character and to define how the character deforms. The details can be achieved through bumpmaps and even better - normal maps. It makes me cry a little, every time I see a model that has been subdivided a million times, has geometry to define cloth wrinkles, face wrinkles,creases/cracks/etc, hair detail, etc etc. Why oh why dont you just make a normal map and bake all that stuff there?

Normal maps are just fancy bumpmaps. Some people convert bumpmaps to normal maps ( not much of a difference there lol). Some people convert textures to normal maps. Want to put some cracks on a rock? There is a photoshop plugin that should do it for you, you can also use xnormal. There is nothing wrong with that- it's just not good enough for something like a next-gen character. While bumpmaps contain information about depth, Normal maps go a step further. They contain information about direction of that depth. So one can have a really low poly character look very very detailed. The only thing that will give it away will be the silhouette of that character.
I know about displacement maps, but I wont go there now :D

So for next gen characters, one basically tells the software to compare the low poly mesh to the high poly mesh and create a normal map for the low poly mesh. Mudbox, zbrush, maya, blender- they all have tools to do that.

Since blender has a special multiresolution modifier for its sculpting mode, it is actually pretty damn good at detailing characters and baking a normal map. It might not be as good at handling giant meshes as zbrush, but its good enough to do the job.

I spent about a week in learning from trial and error about normal maps. For my little experiment, I used the two characters that I made for the moCap module. These guys are pretty much a work in progress and I am not even near pleased at where they are at the moment. Both of them have tangent space normal maps (tangent space is good for meshes that deform, but its a bit more expensive to render than world space, which is good for static objects)


Scarlet Thorn:

Scarlet was made almost entirely in zbrush. I made the hi res mesh (detailing) and exported a normal map from it in zbrush. The texture was also made in zbrush.Whats good about Z and I think is one of it's killer features (correct me if I'm wrong but mudbox doesnt have it) are the selection mask modes. Just with a click of a button, Z is capable of masking all the crease areas- that makes it extremely easy for the artist to flesh out detail..


On the screenshot, you can compare how it looks like with detail in zbrush (actual looks) and then how maya portrays the normal map on the low poly object. I didnt show render, because rendering has million of options to tweak and that alone can make it look like anything.

Zbrush flips the map vertically by default. It also left me with some slight edge marks, which I had to clean with the smudge tool in Gimp. That was a bit annoying, but it still got me a decent normal map.


Sepia Baron:
I dont have to tell you how much more advance zbrush is at sculpting than blender. But the new blender has some key features that make it worth my time. First of all, its a modelling package that has sculpting capabilities. The brush engine in blender is actually kind of nice.I can do the whole pipeline in it- from modelling the low poly (check metaballs as a nice alternative to zspheres), retopology, uv mapping, detailing (sculpting). Blender can do it all :D. Maya is useless at sculpting- utterly useless... So I sculpted detail of my character in Blender- the newest build , then I baked it and got out a nice normal map.


What was surprising about Blender's normal map was- it actually was cleaner than the one I got from zbrush. I know he's a simpler character, but I didnt get anything that needed my attention in gimp.
The only annoyance in blender is that when you subdivide the model, you can really feel the weight. It's probably a good idea to turn off skype while sculpting on subdiv 6. But that is likely to change, when the unlimited clay modifier gets released in some of the future builds. :D


I used the normal map as a basis for the texture, since I wanted to bake some slight shading on the finer detail. The texturing was done completely in Blender+gimp. Its incredibly easy to use them at the same time- blender has a really nice integration with gimp, when it comes to image editing.


Normal maps and rendering engines~ This is pretty much where all the hedaches start for the artist. Different software handles normal maps differently. Maya has three ways of rendering it-
~hardware (viewport) render- seems to display the normal maps without any problems. Note that you should avoid having flipped uv islands- that always offsets the map slightly and creates really ugly seams. I got away with fipped island on the hands and feet, since I wanted to preserve some UV space... but that backfired on me. I needed to go back change the UV of Scarlet thorn in order to get rid of seams. Thankfully zbrush is capable of projecting detail from one mesh onto another (both texture and shape), so I didnt have to redo all that I had.
~Software (maya) render- is absolute rubbish at rendering normal maps. :D I might have missed something. I've tried my best, but not only do I get ugly seams everywhere possible, but its also not very good at representing the hi res detail.
~ Mental Ray render- Seems to be pretty good at normal maps. I got no seams, the hi res detail is pretty good. One thing to note is that it desaturates the textures. I dont know a lot about mental ray. Everything I've posted this far has been rendered with maya's native software render. I dont have the time to learn mental ray, so what I posted now at flickr is as default as it gets.

While still being on the subject of rendering and normal maps, it would be worth looking into how it works and why there are seams/hard edges in some cases. Blender developers have been hard at work on documenting that and improving the normal map baking magic that happens . It certainly has been a growing interest for me to follow its development and there have been some pretty exciting things happening there-keeping my attention.

Thursday, February 10, 2011

my vector graphics workflow

I thought that the time is right to take a break from all this 3d business and talk about vector graphics.

So what is the deal with vector graphics and how do artists generally feel about it?

Vector graphics technology is used in industry alot, because of its infinite-resolution nature. Printing, animation, design, websites, etc etc. The data of the illustration is stored in mathematical (geometric?) equations. A lot like 3d technology (vertices), shapes are rendered with points (nodes). Every line is made out of nodes and every node contains spline data. The splines dictate what the line between the two nodes will be. In 3d technology, I guess when comparing it to the splines, you can say that vertex normals are kind of like that, because they dictate how the surface is going to be rendered inside the silhouette of the character.

vertices-->edges-->polygons--> a 3d character(mesh)
Nodes-->lines-->shapes/fills-->a 2d character/object


Read in more detail Here.

While different software has different advantages, the basic tools for doing vector art remain the same and in this article , I am going to share my workflow with you.


This picture took me about 3 hours

Why Inkscape and not illustrator?

Since I dont own a copy of illustrator on my laptop, I had to use inkscape, which is much like what gimp is to photoshop..


My work process:

1. Draw a rough sketch with the tablet:


So in this part, I just plugin my tablet and make a rough sketch of my robots. Vector graphics software has pressure sensitivity, but since it makes the lines as fills, its almost useless further on.


2. trace the lineart-


Then the next step for me would be to lock the sketch layer , create a new layer and start working on it. In order to see better, I make the sketch layer semi transparent. My fills are by default empty (no color), so whenever I close a shape, it doesnt cover the sketch with some color.

As you can see from the picture, I first put my nodes at the right places, while knowing exactly where nodes are needed. Then To get the shape right, I adjust their splines or just drag-bend the lines. It's very important not too put unneeded nodes, because that would slow down your work.
In many cases, some fills will have roughly the same shape and number of nodes as others, so I usually just duplicate whatever is possible and readjust the splines so it fits.

When Modelling characters or inking them, It's always good to be economical- use just the right amount of nodes/vertices.


3.Put some colors in the fills-

Next on, selecting all fills that will have the same color, I would give them color. Since I hate the dullness of the lines in vector graphics, I tend to keep them either very thin, or completely get rid of them. In this picture example, you will notice that the guy in the car has some lines, while the female robot has almost no lines. I did it this way, just to compare the two styles and think about how to get around the lack of lines. To me lines are just a way to define shape. But when the shape has color, we dont always need the lines. We need to add some shadows here and there to fill the gaps - her neck had to be separated from the head (as a shape), so I added a shadow gradient.Without the shadow, the head and neck both look very flat. One big disadvantage of not having lines is when your foreground object/character does not stand out from the background, which in some cases might have the same/close color. It does look kind of nice though.


So the way I add soft shadows and put some blending between colors in vector art, is by using either BLUR or GRADIENTs.
Blurring does make the file a bit heavier.

Certain colors go well with certain other colors. Colors can be used to set the mood of the picture, to lead the viewer's eye to something. It's generally a good idea to avoid having too many different hues in a picture- it gets too colorful, too distracting.

=================================
So what are the disadvantages for artists and why is it usually a bigger task to make something in vector, than it is to just sketch it?

If you look at it, vector technology is so much better than bitmap (pixels) because of the infinite quality pictures you get out of it. Why is it not used more than bitmap by artists? Well, the answer to that question lies within the process of how that is achieved and in the complexity of the task of vectorizing something like say a photograph of your granny.

In order to get a nice, smooth and polished picture, inside a file that is throughly well structured (easy to edit and reuse for other purposes) you need to do a lot more than just sketch it and then brush in some colors.

To structure it well, you need to build it out of closed fills and define their lines as well. Some of them can contain a pattern or a gradient. They can also be blurred or made transparent.
The more nodes you have on a fill, the more time you need to edit them in order to get the right shape.

One drawback that I believe has always kept artists from vector graphics for cartoon style is the lack of line thickness data type in the nodes. So lines in vector graphics dont have varied thickness. A line is as thick in the end, as it was in the start and the middle. In order to get that natural flow effect, and when drawing with a tablet in flash or illustrator, instead of lines the software creates fills for you. So your brush strokes are being stored as closed shapes instead of lines. That dramatically increases the complexity of your drawing- it makes it harder to edit. It kind of kills the usefulness of a tablet to ink a drawing in vector graphics.

Of course, you can simplify the shapes with a keyboard shortcut in the matter of seconds. All vector packages have a "smooth" command that will clean up some nodes.But that doesnt change the fact that lines are being turned into fills when you use a pressure sensitive tablet.

That has always kept me away from inking my own art in a vector package. The only times I have used Illustrator,inkscape or flash and need it to be in vector format was:
1.when doing design of Icons/software graphics on Vector linux (inkscape)
2. Building character libraries (flash/illustrator) for Scoyo(well, I did some) and my own short flash film from last year :D

There is also the vectorizing software, that would try and do all the tracing work for you. In most cases it does its job, though not perfectly. I would use an automated vectorisation only on clean black and white sketches. The best application for this task seems to be Vector Magic.

Wednesday, February 2, 2011

some models for the mocap and progress on pbank

The animation of piggy bank has gotten a bit longer than expected. The plan was 2 minutes and now its getting a little longer than 4. Truth be told, I hardly work on it lately because of all the other assignments and the part time jobs (I have two of them would you believe it). My plan is to render it when its absolutely perfect. If this was my job and I was getting my bills paid while working on it every day, I am pretty sure it would have been ready ages ago! It's the polishing that eats most of the time- getting those curves and the timing to work well. I am still relatively new to this 3d animation business, but that doesnt stop me from having high standards and be critical with the work.

You see, its not perfect and when its not perfect, I just dont render and post it. :)

It will be probably ready for the festivals this year, so anyone interested to send/suggest invite for events, please feel free to drop an email with the info.I do appreciate that sort of attention :)

The Mocap assignment
So this semester I signed up for one extra module that I believe will be a good addition to my portfolio, especially if I apply for work as an animator for video games. Motion Capture has been around for quite a while now in industry and we've all seen plenty of good ,bad and ugly examples of its use. My personal opinion about it is more or less the same as any other I've heard from classic animators. The truth is that the moCap data is often awkward when applied to the body of a character. I believe that is due to a number of reasons- one being the movement of the actor (often not an actor) not fitting the design of the character.The timing of the movement is too realistic and snappy, it has some random rubbish that needs to be cleaned up (like random gestures). It will never be able to replace good old fashioned animation, but it certainly will continue to be part of what industry needs, especially for sports games. What I hate about the majority of Mocap is just it's mediocrity and genericness.Generic people doing generic things- fighting, running with guns,doing some sports... That is why my goal with this module will be to give character to my characters, make them unique!

Speaking of the that, let me start by introducing them :

yet another character that I designed and modelled- I call him scissorman
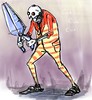
Scissorman aka The Sepia Baron
I created this character as a tribute to classic horror game "Clock Tower".. You might notice my strange obsession with stripes is present here as well. He is kind of like a limping clown. The scissors are there to cut off the next character's head off.

rose creature concept
Plant man aka "The scarlet torn" is a character that I created a year ago. The idea for him came from my obsession with venecian masks+ Edgar Alan Poe's short story
I studied Philology back at the university of my country years ago, so that helped me develop some literary taste and some understanding of ancient to 19th century culture. Ok, enough bragging from me xD moving on

So as you imagine, I will have to model these characters. Well guess what, I already did. I want to talk a bit about the process and some tricks I developed to speed it up. Both characters took two days to model and I spent about 10 hours in total to do them both.
Starting with Z-brush, I first sculpted a high res plantman. Then retopo-ed and UV-ed it in 3d Coat. Getting him back in maya, I started adding the detail that will be on separate meshes (to ease skinning).

The hair, roses, thorns, leaves and so on was all made with CV curves in maya.

Moving on to scissorman,I did him from zspheres and there was no need to retopology, due the nature of his design- Just a bit of extra work in Maya to get the right amount of geometry where needed. I got to the conclusion that the bit that takes me the most time during modeling and is usually the most boring part is getting the topology of the hands right. So, I decided to make a set of hands to reuse in my pipeline, by just attaching them to the model. I made the first hand purely in Maya. It is as low poly as possible. Then I made 3 variations of it, each having a different number of vertices at the connection point- the wrist.


So I took one of them and just stitched it to scissorman and made some minor modifications in the shape. The topology is the best of what can be done on a non realistic character. I dont want to sound a bit arrogant by saying this and it usually happens when I am being critical, but I've seen ALOT of bad topology on hands on the internet. I know mine is no masterpiece too, but some of them real bad ones are being sold for a fortune at cg store websites. :D It's mind blowing. Have they no shame?


Moving on to UV mapping, I realized that I dont really need to use different space of one uv shell, if its going to be exactly the same as it's symmetrical counterpart. So when I uv-ed scissorman, I made sure that his left and right hands,arms, feet, and so on have the same uv shells. So after unwrapping them in Blender (of course- because its much much much better than maya at this) what I did was flip over and lay the left side uv shells over the right side ones. So the left and right hand of the character would occupy exactly the same place in UV space.

The one disadvantage of this is the obvious inability to be asymetrical with the texture.
The advantages are too good to pass on though- Not only do I have to paint only one side of the model at certain parts, but I get to give them all more UV space, more pixels for the texture!


The mocap data is going to be put into short loop sequences that can be used for a game. So the big picture is , if this works out nicely, we will be able to assemble a team of other students from gamings course and import this stuff in a mini UDK or other engine project. I am not going to go into detail about the game at this point, as it is not clear if it all will work out..

Friday, January 7, 2011

Piggybank animation WIP update

Happy new year , folks . :D

The deadline for the assignment is up and some of you might be wondering as to how far I am done with the piggy bank project. Well, I submitted the body animation - so I did what was expected of me by university. But having only body animation is not enough to tell a story and be satisfied with it. No, I continued working on the animation and have got a bit more than 3 minutes of animation by now- pure action body animation.

I tried to get the character to do as many different physical actions as possible, but while staying in character and telling the story. One of the most common mistakes of young animators is putting too much action too quick to the point where it gets confusing to watch. Another thing I tried to avoid is having a CG camera. I really wanted the camera to feel like its a real camera.

So let me start by crediting Shutter for the excellent screenshot+presentation tool that it is. A completely free piece of software that helps me save time from photoshopping, in order to present you with screenshots.


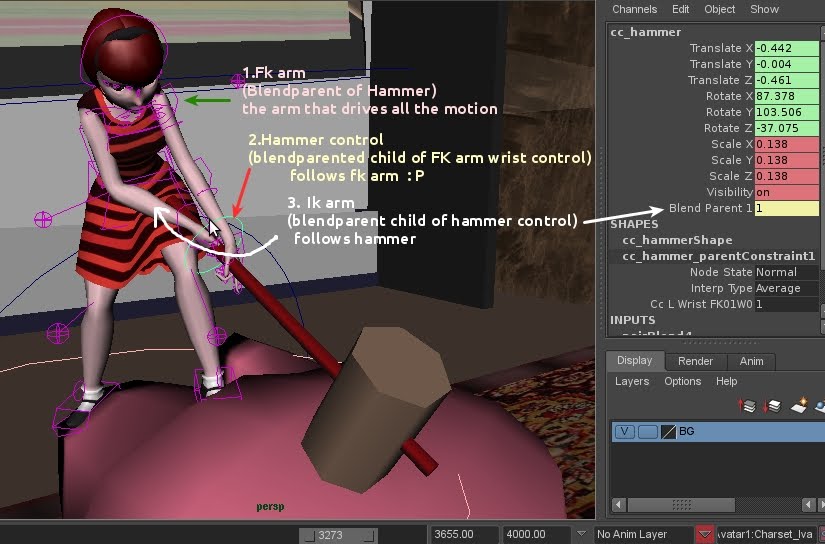
In this particular setup I am using what is known in Maya as the blendparent node.Whats beautiful about is the fact that I can directly parent constrain objects, while still having the ability to key them and have on/off switches - partial(rotation, translation, etc etc) and even to what degree is it affecting the object. Sounds confusing , but its really simple and what I get from it saves me hours. So in this setup to make her swing that hammer, all I need to keyframe is the left (fk) arm. I dont have to touch the hammer or the right (IK) arm, they just follow. And since the hammer is a natural extension of her arm, if we look at this as far as posing is concerned, its naturally fine to control its position and angle with the rotation of the left wrist. I picked FK to drive the hammer, because fk gives us nice clean arches. IK is a real pain in the neck. I found myself using IK only in cases where the character's hand must stay put on an object (pushing something, or hanging onto something). It might look like less work to beginner animators, but IK DOES NOT SAVE TIME in most cases :), but it does in some. The conclusion is that a rig must have BOTH or the animator is stuck spending much more time than needed. Ok moving on.

Speaking of arches, lets take a minute to appreciate the importance of having them clean and natural:

As you can see in the picture, I used maya's ghosting tool to keep track on the arches where needed.Its basically the 3d equivalent of onion skinning. On the right side of the screenshot, you can see the graph editor. I was extra careful with my curves this time. The stoneage animation really suffered because its timing was bad, but also the spacing had zero work put in it. So , after reading books, looking at tutorials and so on, I began to appreciate the power that I can get out of this spaghetti nightmare machine. It's really simple after one gets to know it better. For instance, I could offset a big number of poses by just moving their keyframes up/down in the graph editor (add more +X on that range of poses+controls, more +Y on the other range...) . Another example of neatness is the ability to just scale down an action- both in timing and poses. Are your poses too extreme? Select what you need in the graph and scale them down on the Y. That and so many other ways one can save time, makes it a BIG advantage over other animation methods. I can see now why adobe is bringing it to FLASH and appreciate that.


While animating, I noticed that I made her arms slightly too long. That might be both an advantage and disadvantage, but its not as bad as to force me to fix the model and rig. Should be fine to do it safely though, since its referenced and the animation data is kept in its own file.

Speaking of models, I felt somewhat creative and made these two flash viewers as promised:


The poses are not excellent, but one can at least take a nice look at the model.


Whats left now for me to do is add a couple of shots to finish the story and then do some more cleaning up in the graph editor,most notably the center of gravity control- thats the most noticeable thing.The controls that drive the action must have good curves this time. Also put the facial animations. For that part I already have a few tricks up my sleeve to save me hours of fiddling around. Bless R&D

Saturday, December 11, 2010

pbank animation 50% + the "Kinect" video project

I've been limited as to how much time i can spend on the piggy bank project, but there is seemingly hope that I will manage to finish it before the deadline (dec17). The storyboard that I had went through some revisions and now the film seems to be much more fun to work on. The Story is an important thing to me, working on something matters only when it has a meaning (or you get payed to do it lol, or in the best case- both). I am not going to spoil it too much though, so no animatic will be posted at this point. I even started reading a book on screen play writing!
Its still about buying shoes. I only made it a bit more unpredictable and imaginative.

Anyway, let's have a look at my current setup in Maya (ignore the poses- its WIP) :


First of all- this time I am keeping my rigs, the background and props in separate files. The scene file contains only the keyframes, the camera rig and lights. That way I feel a little bit tidier/safer. Every time changes are made to a file while being referenced, maya stores them changes as nodes, it doesnt touch the rigs or whatever is referenced. But doing geometry/other changes to the items while they are referenced is not the best of ideas. Maya adds unneeded history to the scene file and it causes it to crash on loading in some cases, as I found out. Luckily, I could just open the file without loading its references, then go to the "reference changes list" and clean it up. Works beautifully now.

Second- the Camera setup is much better than the one i had for Stoneage. Its incredible how much more control one can get just by parenting the most normal cam to a simple locator.

For the animation- This time I have even less time to work on it, because of the greater number of side assignments and the part time job that i have. For the two weeks spent on it, I have worked very little on it, hardly full time. You can say only 2 days of the week full time and the rest- on and off for an hour or two. This time though, I feel more comfortable with the tools. I found ways to save time by using character sets+ selection sets. Its incredible how much of the frustration goes out the window with these.
I also took my time in research before putting a single keyframe! I have a big mirror in my room now, also shot some home videos of me doing stupid stuff (ended up hardly using that, but still fun)

The Background- I have uv-ed almost everything with Maya and painted the textures with Mudbox+photoshop/gimp.


With all this said, I want to assure everyone following the progress on this that I am certainly not going to abandon it at the deadline and leave it incomplete. I will continue polishing it and adding to it and then use that on a showreel. What I submit will have only body animation- no facial animation and no animation on the fingers, it will be rough. I think of not uploading it to the web yet, maybe just a playblast or two.

Ok, lets move on to the other assignment. This year I have a new module at university- Video production.


I worked in a team with 5 people to make a 2 minute film. I was assigned as the writer and director, but also ended up doing most of the editing in Final Cut pro. This proved to be a very good learning experience for me. I learned quite a lot about final cut pro, about the common mistakes that can be made when compositing, about the pitfalls of organizing a film. I have to say though, I enjoyed being a director on a live film. Not being supposed to build all the characters and sets and then "animate" everything. But it was hard to get the actor to do whats in my head. He didnt say some of his lines properly, we were missing a prop and I had to cut off some of the shots- as a result the story is a bit disjointed/inconsistent in the end. The blue screen had different tonal values, his clothes were dark and had some reflectivity - that made it a bit hard to clean up in post.
The film was shot in 5 hours. Here are some of the failed takes of some shots- just for the fun of it. :D
None of us had any prior experience with shooting life action. I wrote the story the day before- in half an hour. The sound should need some extra editing too.

Monday, November 15, 2010

pbank - rig done

I finished this rig a couple of weeks ago, but since I had other university assignments and part time work I couldnt do much on the skinning process for a while. It took about a week to learn all the new stuff and make this rig.


The previous human rig that I made had some disadvantages. One mainly being the spine area. When animating the cave man, I quickly found out that too much twisting would cause collapsing in the geometry where the joints are. So this time I did my research and tried other rigs. That led me to what Digital tutors' Delano has in their latest dvd. It's called n-spine and it manages to do the trick beautifully while also being relatively simple to set up.Here is an example of a twisting spine:

Another great thing about this rig has to be the fact that everything has "follow" switches. If I move the torso, the head and arms will follow now!


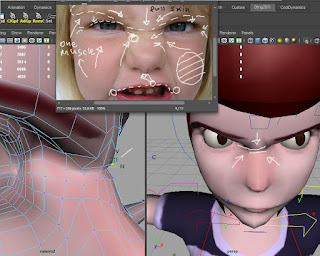
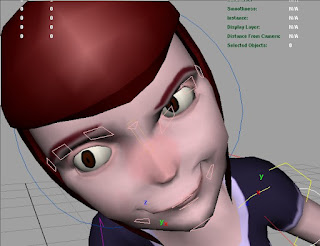
While i wasnt supposed to make any facial controls,I kind of did it anyway. I wanted to practice that more. The previous models that I made felt kind of limited in that regard. So I sat down and looked at my own face doing weird expressions, figuring out how the muscles are pulling the skin, also remembering everything i know from observational drawing...I am a big believer in trial and error learning. So I challenged myself yet again, deciding to make a face rig that is simple, yet effective, no blendshapes. All the controls are on the face itself, since its easier to access them like that.
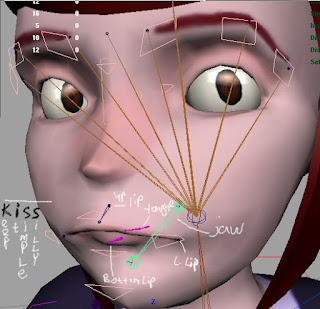
This face rig is quick,experimental and a bit messy. The eyebrows are made of just a bunch of joints.


The mouth is purely my work of fiction and it's made out of joints too:

(top lip,bottom lip, left and right
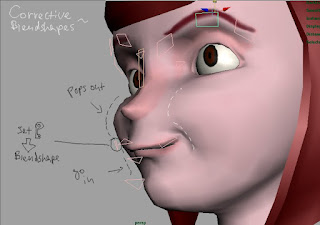
lip)+ a couple of corrective blend shapes
The left and right joints of the lip have set driven keys on rotation. As I move them on Y, a rotation is triggered to put a small twist. as I move them closer together, that triggers a corrective blendshape to stop the geometry from collapsing and keep the volume in the lips


The jaw can go backwards and forwards( appart of up and down) , just like a real jaw..


when she smiles, the cheeks would come out a bit through the magic of set driven key:

The system is not perfect. I might need to do some work on the weights.It's biggest advantage is the low number of controls and the power you get out of them.


The less you have to keyframe to get what you want, the better! This is basically my mantra now. If its possible to get the same amount of flexibility with something that is simple and straightforward, I will go through fire and ice to get it to work right.This applies for facial animation the most. I will probably do my rig with only blendshapes next time though. This painting of weights of joints on the face was a real pain in the neck.

Things to note when it comes to skinning:
Keep the inside of the mouth as a separate mesh, if you dont want to waste time getting the weights there right. One common problem when skinning is when the interior of the mouth comes through the surface of the skin. I really hate painting weights, so I didn't spend too much on that part. One of the most annoying parts for me personally is getting the weights on the fingers right.
As you can see from the picture, the eyebrows and the lips may need some more work when it comes to skinning xD


Saving time~
The rig is the thing that takes most of the time in the pipeline, so I am looking into automating the process and even reusing what I can on the next model. I learned how to copy weights from one model onto another,so I can use the same rig on models with similar proportions/posture. But doesn't solve the problem. 3ds max and blender have automated rig generators. maya has mel scripting and plug-ins. The best one out there has to be the setup machine.
If I was to do this in a short deadline, I would go for the setup machine and just customize the rig that it generates.Thats what i did with the mammoth rig and it worked out beautifully. Tsm is very very flexible!

The only reason that I keep doing it manually is because I want to learn how it all functions under the hood. Having problems and resolving them is the best way to acquire experience.

I know that for this uni assignment I will probably not need a lot of the controls that I have here. When I start doing something for a second time, and there is nothing at stake,but my time- then it's best to try to do it in new ways. It is so tempting to stray from the standard path and see if there's another better solution to each problem. It's just never perfect. Some people are telling me that I might become a generalist if I keep going like that- trying new software and techniques. But I will always think that doing that is giving me an edge over anyone who sticks to only one way, one software. It's just not good to be too satisfied with something when there's always a new way to do it better,faster, simpler.

Animation:
Last time I did my animation in maya, I was really messy. Since then, I've managed to learn more about the graph editor, tweening and generally how to do it properly.
I will try to put up another 3d viewer thingy for Eve in the next post

Sunday, October 24, 2010

Summer ends and project Piggy bank


Well, I worked all summer. No, it wasnt for a studio or anything like it. So I couldnt get more good stuff to put in my portfolio. So there is a lot of catching up for me to do now.


My 2d and 3d animation (malfunction and Stoneage) were shown at a couple of festivals, one of which the Moscow festival of Contemporary Animation . Unfortunately their website is in flash, so in order to see my entry, you need to go to English>Participant2010> and I am under number 44


EDIT: Just received a honorary letter from the general Producer of the festival.


And while being at it, here is a screenshot of the finalists page of CG coach awards, where you will find me listed. I am putting it on a screenshot, just in case they take the website down.


Second year of university started and I've been busy doing all sorts of class assignments. Somehow inbetween the whole chaos, there is still time for me to have fun with new software.

Let me first start with whats my homework for this semester. A 30 second (tops!) 3d animated film featuring a girl lifting a heavy object. I already had two storyboards which I was eager to do, but then a certain someone decided that students should have less choice. So the tutor gave me a list of types of characters and things they can possibly do.
This was the one that:
a) everyone else was not doing
b) tolerable (one of them "auditioning for x factor" urgh and they expect me to do it without any voice/sound)

So I picked the girl scenario and quickly scribbled this storyboard literally a couple of hours before the deadline:
https://docs.google.com/fileview?id=0B4WmGlTeh8z8ZTJhOTg1N2ItYjBmMi00MzRlLTgyM2EtNWQ1ZmY3NGE2ZTE3
I still feel that the ending is weak. Maybe I can change it somehow.

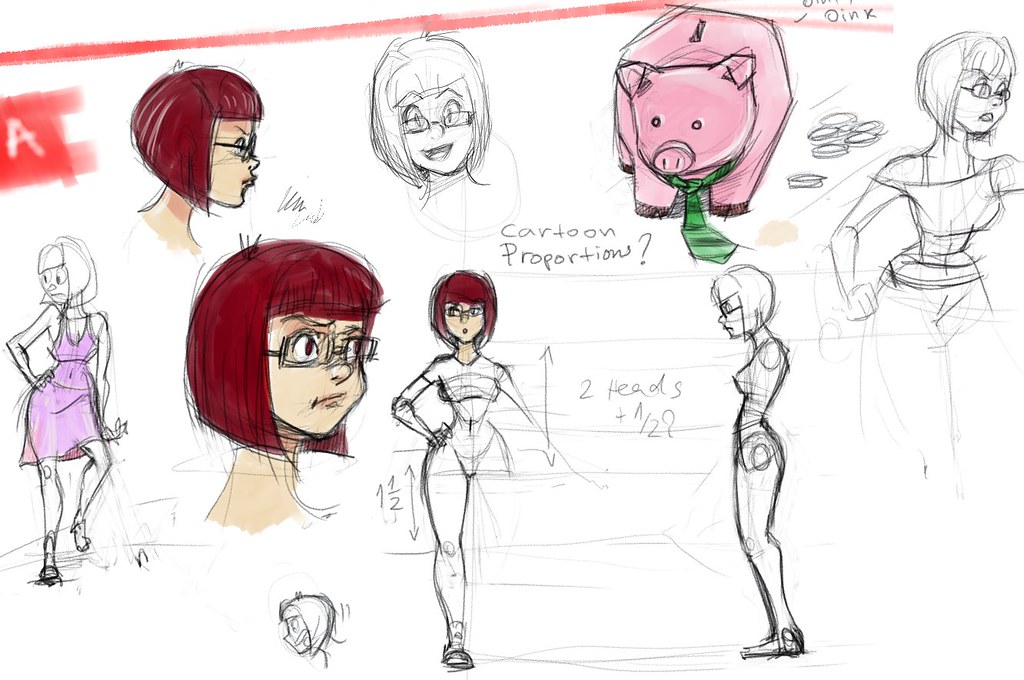
And here is the concept art that I made:


Made with my favorite open source painting app- Mypaint

And then I modeled the girl with zbrush, fixed her topology on the hands and added detail in Maya. The retopology tool in zbrush 3 would create holes in the area of the hands. So the easiest approach there is to just do the tricky parts in Maya or blender.

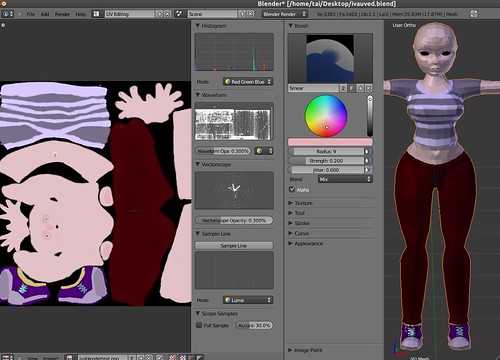
Next on is UV mapping and texturing. Since the character is with a cartoony design, I decided to avoid putting much realistic details. With 3d its very easy and tempting to make the model pointlessly detailed, but less can be more in this case. UV mapping and texturing was done in Blender 2.54 and took a couple of hours.

Blender-uvSeamsScreenshot

I decided to give the new Blender a try, because it has some tools that are better than Maya's at the moment. Uv unwrapping and sculpting mode are especially nice in blender. My hope to see a better sculpting mode in Maya is almost nonexistent since Autodesk also owns Mudbox and likes it when people keep buying it.:P So yeah, its also 0$. Of course it has some annoyances and quirks, but the more I use it the easier it gets. Texturing mode in blender lacks symetry, or at least I couldnt find it. Also pressure sensitivity for my tablet model didnt work, so I made the simplest most basic texture possible.

blender-polypainting

Her shape still needs some tuning. I will use belnder's sculpting mode to fix the hips/legs and head. I noticed that when I import it and soften the edge normals in Maya, her proportions look kind of different to the eye. That might need some adjusting too.

My goals with this animation are:
-learn Blender 2.5 and integrate it in the pipeline (70% done- I need to learn more)
-use maya dynamics - Maya hair or Maya cloth, but keep it very cheap on CPU/render time. Do that after the animation is complete.
Deadline is till the end of semester one. This new knowledge will help me create the next project- a storyboard that I've been working on for a while now.

Monday, May 24, 2010

Look back at the past few months and plans for the summer

What, no shiny pictures this time? I decided to take a step back and look at the achievements this year. I will also look at the things that need some more work.

University first year is over, and while I didn't complete everything I wanted to complete, it was a fairly successful year for me.

The "Malfunction" aka "Toast!" flash animation:
I taught myself the new rigging capabilities of flash. I also met all the bugs that cs4 had to offer.
Time to complete: 1 week storyboard + 1 week for the drawings(character libraries) +1 week to animate= 3 weeks.

Then after it was completed I had to cut it down from 90 to 30 seconds. Cutting it down brought me to my first encounter with Adobe after effects. That was a valuable lesson, which helped me do the next project- Stoneage.

"Malfunction" was sent to one festival this far.

Things I can improve in it- some of the shots need refinement. The continuity of action is not perfect. I think of adding some shots in the beginning.

Stoneage - 3d animation short
Stoneage took about a month + 1 week to complete.

here is an improved render:

stoneage - 2010 from todor imreorov on Vimeo.


It was submitted to a CG contest. And It qualified me as a finalist in excellence in rigging category!! Now I am competing with final year students and people who have graduated (twice even). People with enormous amount of experience behind them. Just look at the list:
http://www.cgcoach.com/beta/cgsa/finalists/category/excellence-in-riggingtd.html
I am the guy with the robot avatar. My character set ups has to be the simplest of the lot. What I believe makes them good is exactly how simple and clear, but effective they are. The characters did everything that I needed for the 1 minute short.
The first and second prizes for this contest are both Internships at big studios in London! I can only hope now.

On the other hand, I couldn't qualify at the animation category and I don't blame them for that. The animation in stoneage is far from good.

I kind of ruined some of the shots in the last minute before rendering.
Some of my tutors told me to speed it up and make some changes. It was in the last moment, so the hasty changes to the old shots were bad. I scaled and snapped some keyframes, causing choppiness in the run cycle. Also messed up some of the key poses. The splines are hardly tuned or refined. Stoneage needs some work before I feel safe to send it to the festivals this year. Before making the refinements, I decided to spend some time looking into more professional ways of working on animation in Maya. For that purpose I chose the best tutorials that one could possibly find in the library- the book "How to cheat in Maya 2010 - tools and techniques for the Maya animator- by Eric Luhta.


By the time I was making these short animations, I got invitations from a bunch of festivals:

* Halifax,uk- "fundada artists film festival 2010" - deadline 31 may

* Moscow - "International Fest of Contemporary animation & media-art LINOLEUM" - deadline 1st of september

* Uk - Flip animation festival (email from Mark Goodliff)- deadline - july 9th

* animation festival "Anifest 2010" based in Canterbury (email from Mark again) - deadline 17th september

* Project twenty1- USA. This one is actually pay to get in event, and involves traveling to the states, so I will skip it for now.

Whats next for the summer?
One in my list is refining Stoneage before sending it to the festivals. If I win the cgcoach award, it will be one interesting summer for me.

Finding a job is high in my priority list, since I need it badly in order to stay in the UK- pay for rent and food next year. I dont want to rely on my dad and bursaries. I will stand on my own two feet.
Refining some of the skills that I need is the second priority:
Get faster at the modelling and texturing pipeline. Learn maya hair, cloth and how to add some automated secondary motion that is fairly clean , controllable and not too expensive as cpu power goes. I have already started research on those topics months ago. My tutor prohibited me from using any dynamics or overly complicated things in my rigs for the animation assignment. Now that the animation assignment is over, I can experiment with those features freely.

I am also planning my second year animation from now on. There is already a story for it, and there are some weird things that I need to make maya do in order to achieve the quirky shots. Before looking into those, I will take my time to build the set and the characters. Having that plus the animatic will earn me some interest and support for the project in the future.

Saturday, May 1, 2010

Stoneage- Putting it together with sound

I needed only two days to put the image sequence into video and add sound.

The video compile was done with after effects. I took 9 frames out of it, and added an ending screen. The animation is 1:20 , which is not much, considering I wanted to add stuff but some people advised me not to, because I might spoil the jokes.I also added some fading out and changed the timing of some of the shots.


I made two versions of the video- encoded and non encoded (highest quality).

On to Sound. The sound was done with the excellence of soundbooth, which is a very simple and powerful application. I made multiple revisions of the effects in it. Some of the sounds were fine tuned to be slower or with a lower pitch.There was some static noise that had to be removed, I did some fade in/outs on the sounds too..For music, I used some african war drums and nature ambient. I was very careful when picking the music and sounds, not to use anything that is copy righted material.


aaand here's the finally completed animation- STONEAGE

http://www.youtube.com/watch?v=M3V4BSeAgPc

don't forget that this is my FIRST ever 3D animation. I have never done this before.