nav2

Showing posts with label 3d viewer. Show all posts

Wednesday, May 18, 2016

Texturing PBR materials in 3D Coat and exporting to Unreal 4

3D coat generated an ambient occlusion and a curvature map for each object I painted in it - that way it knew how to paint in crevices that are stored in the imported normal map.
It was excellent in this regard as I found out that it can handle memory quite well when compared to Substance Painter. In 3d Coat I was able to get over 40+ layers on 2x2048 maps of 3 paint objects - with all channels + normal map. In substance painter - it just crashed on the second or third layer I made (preview texture set to a miserable 512).Even though my laptop is 7 years old - 3d coat handled this one quite gracefully.

For the skin I used one of the leather pbr shaders that came with 3dc and heavily altered it to make it look more like human skin.
Of course it is really difficult to fake SSS in real time. Unreal engine - which is the target engine for this character does have a SSS shader, but since the character will not get any closeups and not much of the skin is really revealed- I decided to be cheap again and stick with one material for the entire character. Before texturing the body I made an import test of the head/spray mask texture.

I set the texture maps in unreal in a way where the alpha channel of the diffuse is used to store the roughness map pass. I also wanted to use tha alpha channel of the normal map to store the metalic pass, but I found out that Unreal 4.10 does not allow using the alpha channel of a normal map texture if the file is a png. A few forums noted that it will work if I use targa instead - but targa is a huge file size and I thought i wont be saving a lot that way.


I imported my character with the unreal rig applied to it.
Here is the model - you should be able to preview it in your browser:


For the spray cans in the game I used an rgb map to split it into three areas - cap, sticker and can . The alpha channel of the sticker controls the sticker's mask in this case. That way the programmer on the project - Steve Stavrev can control the color of each instance of the spray and even change it dynamically during run time to create some interesting effect. 
His pose and animation is not my work - it is using one of the unreal project examples. Since my binding pose and the source binding pose are slightly different, the actual animation is a bit screwed up on the target. Unreal 4 supposedly has nice tools to adjust binding poses and when this issue is at hand, but I discovered that as I am writing this (4.10.4) there has been a bug for over an entire year that nobody from epic fixed that stops the users from doing that. I had to blindly set up the bones in blender, but the fingers are still screwed.
The best thing to do here for my portfolio is to actually make the animations myself, but unfortunately the freelance nature of the project dictates that we make do with this.

Wednesday, October 10, 2012

Personal research during the internship - Characters


Having a job can take too much of your daily energy to be able to get on with short films. So as you might have noticed, there is a big gap in updates at this blog. Nothing posted here for a year!
Some of the time felt right for me to look at  my favourite childhood cartoons and games and try to evaluate what made them special at the time. Studied their art styles, analysed their stories .
Part of that was replicating the stylized characters in 3d- researching how to make that transition possible and what might get lost along the way .


 Kimba the white lion fanart model- made it hastily with metaballs in blender . Retopoed with Bsurfaces. This is a demonstration of the dublicated mesh approach to cartoon lines real time rendering. 


I thought a lot about types of character designs in eastern and western culture, trying to classify them in my head. It was sort of fun to reverse engineer characters, while thinking how their design tells the audience their story and sets them up to be the part of the fiction that they are in.


Making sketches helps me get the shape in my mind - inspires me to model my own characters.

There were some styles that I feel personal distaste with, so I avoided taking anything from them even though they are famous.
If you're in the mood of some more jibber-jabber on what I think of anime today, please visit my other blog, where I posted a huge rant on the subject.

Friday, January 7, 2011

Piggybank animation WIP update

Happy new year , folks . :D

The deadline for the assignment is up and some of you might be wondering as to how far I am done with the piggy bank project. Well, I submitted the body animation - so I did what was expected of me by university. But having only body animation is not enough to tell a story and be satisfied with it. No, I continued working on the animation and have got a bit more than 3 minutes of animation by now- pure action body animation.

I tried to get the character to do as many different physical actions as possible, but while staying in character and telling the story. One of the most common mistakes of young animators is putting too much action too quick to the point where it gets confusing to watch. Another thing I tried to avoid is having a CG camera. I really wanted the camera to feel like its a real camera.

So let me start by crediting Shutter for the excellent screenshot+presentation tool that it is. A completely free piece of software that helps me save time from photoshopping, in order to present you with screenshots.


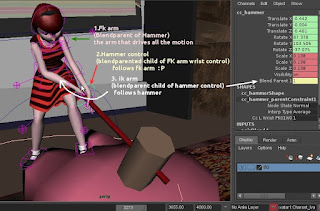
In this particular setup I am using what is known in Maya as the blendparent node.Whats beautiful about is the fact that I can directly parent constrain objects, while still having the ability to key them and have on/off switches - partial(rotation, translation, etc etc) and even to what degree is it affecting the object. Sounds confusing , but its really simple and what I get from it saves me hours. So in this setup to make her swing that hammer, all I need to keyframe is the left (fk) arm. I dont have to touch the hammer or the right (IK) arm, they just follow. And since the hammer is a natural extension of her arm, if we look at this as far as posing is concerned, its naturally fine to control its position and angle with the rotation of the left wrist. I picked FK to drive the hammer, because fk gives us nice clean arches. IK is a real pain in the neck. I found myself using IK only in cases where the character's hand must stay put on an object (pushing something, or hanging onto something). It might look like less work to beginner animators, but IK DOES NOT SAVE TIME in most cases :), but it does in some. The conclusion is that a rig must have BOTH or the animator is stuck spending much more time than needed. Ok moving on.

Speaking of arches, lets take a minute to appreciate the importance of having them clean and natural:

As you can see in the picture, I used maya's ghosting tool to keep track on the arches where needed.Its basically the 3d equivalent of onion skinning. On the right side of the screenshot, you can see the graph editor. I was extra careful with my curves this time. The stoneage animation really suffered because its timing was bad, but also the spacing had zero work put in it. So , after reading books, looking at tutorials and so on, I began to appreciate the power that I can get out of this spaghetti nightmare machine. It's really simple after one gets to know it better. For instance, I could offset a big number of poses by just moving their keyframes up/down in the graph editor (add more +X on that range of poses+controls, more +Y on the other range...) . Another example of neatness is the ability to just scale down an action- both in timing and poses. Are your poses too extreme? Select what you need in the graph and scale them down on the Y. That and so many other ways one can save time, makes it a BIG advantage over other animation methods. I can see now why adobe is bringing it to FLASH and appreciate that.


While animating, I noticed that I made her arms slightly too long. That might be both an advantage and disadvantage, but its not as bad as to force me to fix the model and rig. Should be fine to do it safely though, since its referenced and the animation data is kept in its own file.

Speaking of models, I felt somewhat creative and made these two flash viewers as promised:


The poses are not excellent, but one can at least take a nice look at the model.


Whats left now for me to do is add a couple of shots to finish the story and then do some more cleaning up in the graph editor,most notably the center of gravity control- thats the most noticeable thing.The controls that drive the action must have good curves this time. Also put the facial animations. For that part I already have a few tricks up my sleeve to save me hours of fiddling around. Bless R&D

Sunday, March 7, 2010

Mammoth mesh

Yesterday I created a mesh for the second character of my upcomming animation short for Bradford University. The mammoth is a low-poly mesh that consists of 820 quads, 4 textures and uv maps. I did the whole thing from scratch in 5 hours, using mainly Maya, but also Z-brush for the UV mapping and Photoshop for the texturing and transparency maps.


You can see a better quality render at my flickr gallery, which is previewed in a small window on the left side of this blog.

I found out how to embed 3d in flash content, so from now on, I will be able to post actual 3d viewers instead of static pictures :P

Monday, March 1, 2010

UV mapping and texturing of cave guy

Today I cleaned up the topology and finished the UV mapping and texturing work of cave guy. I used Z-brush to do the UV and Z-brush and photoshop to create and edit it's texture. There are no seams visible. I might have over saturated the skin tone. There'll be a couple of test renders later.


name of mesh: Cave dude
number of polygons: 3559
texture size: 1024x1024
Time taken: 3 days- one to sculpt,one to retopologise, and one to uv and texture...


Another thing I did was softening the Normals of the whole mesh and then hardening them on some of the edge loops.


It might not be a very good idea to uv it before it's boned, skinned and tested, but I just had to do it today.This was something I wanted to learn from ages. Now that I know how it's done, I think I will enjoy texturing organic stuff in the future.
I have to say though, I am relying too much on my tablet. If I didn't have a wacom tablet, this would have been very hard to achieve in 3 days.