The deadline for the assignment is up and some of you might be wondering as to how far I am done with the piggy bank project. Well, I submitted the body animation - so I did what was expected of me by university. But having only body animation is not enough to tell a story and be satisfied with it. No, I continued working on the animation and have got a bit more than 3 minutes of animation by now- pure action body animation.
I tried to get the character to do as many different physical actions as possible, but while staying in character and telling the story. One of the most common mistakes of young animators is putting too much action too quick to the point where it gets confusing to watch. Another thing I tried to avoid is having a CG camera. I really wanted the camera to feel like its a real camera.
So let me start by crediting Shutter for the excellent screenshot+presentation tool that it is. A completely free piece of software that helps me save time from photoshopping, in order to present you with screenshots.
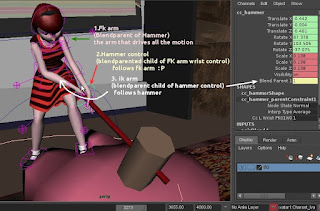
In this particular setup I am using what is known in Maya as the blendparent node.Whats beautiful about is the fact that I can directly parent constrain objects, while still having the ability to key them and have on/off switches - partial(rotation, translation, etc etc) and even to what degree is it affecting the object. Sounds confusing , but its really simple and what I get from it saves me hours. So in this setup to make her swing that hammer, all I need to keyframe is the left (fk) arm. I dont have to touch the hammer or the right (IK) arm, they just follow. And since the hammer is a natural extension of her arm, if we look at this as far as posing is concerned, its naturally fine to control its position and angle with the rotation of the left wrist. I picked FK to drive the hammer, because fk gives us nice clean arches. IK is a real pain in the neck. I found myself using IK only in cases where the character's hand must stay put on an object (pushing something, or hanging onto something). It might look like less work to beginner animators, but IK DOES NOT SAVE TIME in most cases :), but it does in some. The conclusion is that a rig must have BOTH or the animator is stuck spending much more time than needed. Ok moving on.
Speaking of arches, lets take a minute to appreciate the importance of having them clean and natural:
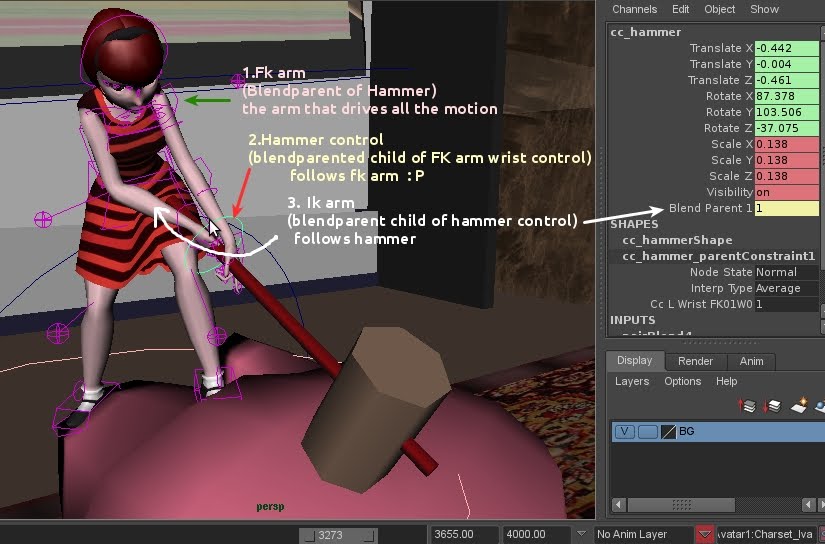
 As you can see in the picture, I used maya's ghosting tool to keep track on the arches where needed.Its basically the 3d equivalent of onion skinning. On the right side of the screenshot, you can see the graph editor. I was extra careful with my curves this time. The stoneage animation really suffered because its timing was bad, but also the spacing had zero work put in it. So , after reading books, looking at tutorials and so on, I began to appreciate the power that I can get out of this spaghetti nightmare machine. It's really simple after one gets to know it better. For instance, I could offset a big number of poses by just moving their keyframes up/down in the graph editor (add more +X on that range of poses+controls, more +Y on the other range...) . Another example of neatness is the ability to just scale down an action- both in timing and poses. Are your poses too extreme? Select what you need in the graph and scale them down on the Y. That and so many other ways one can save time, makes it a BIG advantage over other animation methods. I can see now why adobe is bringing it to FLASH and appreciate that.
So let me start by crediting Shutter for the excellent screenshot+presentation tool that it is. A completely free piece of software that helps me save time from photoshopping, in order to present you with screenshots.
In this particular setup I am using what is known in Maya as the blendparent node.Whats beautiful about is the fact that I can directly parent constrain objects, while still having the ability to key them and have on/off switches - partial(rotation, translation, etc etc) and even to what degree is it affecting the object. Sounds confusing , but its really simple and what I get from it saves me hours. So in this setup to make her swing that hammer, all I need to keyframe is the left (fk) arm. I dont have to touch the hammer or the right (IK) arm, they just follow. And since the hammer is a natural extension of her arm, if we look at this as far as posing is concerned, its naturally fine to control its position and angle with the rotation of the left wrist. I picked FK to drive the hammer, because fk gives us nice clean arches. IK is a real pain in the neck. I found myself using IK only in cases where the character's hand must stay put on an object (pushing something, or hanging onto something). It might look like less work to beginner animators, but IK DOES NOT SAVE TIME in most cases :), but it does in some. The conclusion is that a rig must have BOTH or the animator is stuck spending much more time than needed. Ok moving on.
Speaking of arches, lets take a minute to appreciate the importance of having them clean and natural:
 As you can see in the picture, I used maya's ghosting tool to keep track on the arches where needed.Its basically the 3d equivalent of onion skinning. On the right side of the screenshot, you can see the graph editor. I was extra careful with my curves this time. The stoneage animation really suffered because its timing was bad, but also the spacing had zero work put in it. So , after reading books, looking at tutorials and so on, I began to appreciate the power that I can get out of this spaghetti nightmare machine. It's really simple after one gets to know it better. For instance, I could offset a big number of poses by just moving their keyframes up/down in the graph editor (add more +X on that range of poses+controls, more +Y on the other range...) . Another example of neatness is the ability to just scale down an action- both in timing and poses. Are your poses too extreme? Select what you need in the graph and scale them down on the Y. That and so many other ways one can save time, makes it a BIG advantage over other animation methods. I can see now why adobe is bringing it to FLASH and appreciate that.
While animating, I noticed that I made her arms slightly too long. That might be both an advantage and disadvantage, but its not as bad as to force me to fix the model and rig. Should be fine to do it safely though, since its referenced and the animation data is kept in its own file.
Speaking of models, I felt somewhat creative and made these two flash viewers as promised:
The poses are not excellent, but one can at least take a nice look at the model.
Whats left now for me to do is add a couple of shots to finish the story and then do some more cleaning up in the graph editor,most notably the center of gravity control- thats the most noticeable thing.The controls that drive the action must have good curves this time. Also put the facial animations. For that part I already have a few tricks up my sleeve to save me hours of fiddling around. Bless R&D
No comments:
Post a Comment