nav2

Showing posts with label piggybank. Show all posts

Wednesday, February 2, 2011

some models for the mocap and progress on pbank

The animation of piggy bank has gotten a bit longer than expected. The plan was 2 minutes and now its getting a little longer than 4. Truth be told, I hardly work on it lately because of all the other assignments and the part time jobs (I have two of them would you believe it). My plan is to render it when its absolutely perfect. If this was my job and I was getting my bills paid while working on it every day, I am pretty sure it would have been ready ages ago! It's the polishing that eats most of the time- getting those curves and the timing to work well. I am still relatively new to this 3d animation business, but that doesnt stop me from having high standards and be critical with the work.

You see, its not perfect and when its not perfect, I just dont render and post it. :)

It will be probably ready for the festivals this year, so anyone interested to send/suggest invite for events, please feel free to drop an email with the info.I do appreciate that sort of attention :)

The Mocap assignment
So this semester I signed up for one extra module that I believe will be a good addition to my portfolio, especially if I apply for work as an animator for video games. Motion Capture has been around for quite a while now in industry and we've all seen plenty of good ,bad and ugly examples of its use. My personal opinion about it is more or less the same as any other I've heard from classic animators. The truth is that the moCap data is often awkward when applied to the body of a character. I believe that is due to a number of reasons- one being the movement of the actor (often not an actor) not fitting the design of the character.The timing of the movement is too realistic and snappy, it has some random rubbish that needs to be cleaned up (like random gestures). It will never be able to replace good old fashioned animation, but it certainly will continue to be part of what industry needs, especially for sports games. What I hate about the majority of Mocap is just it's mediocrity and genericness.Generic people doing generic things- fighting, running with guns,doing some sports... That is why my goal with this module will be to give character to my characters, make them unique!

Speaking of the that, let me start by introducing them :

yet another character that I designed and modelled- I call him scissorman
Scissorman aka The Sepia Baron
I created this character as a tribute to classic horror game "Clock Tower".. You might notice my strange obsession with stripes is present here as well. He is kind of like a limping clown. The scissors are there to cut off the next character's head off.

rose creature concept
Plant man aka "The scarlet torn" is a character that I created a year ago. The idea for him came from my obsession with venecian masks+ Edgar Alan Poe's short story
I studied Philology back at the university of my country years ago, so that helped me develop some literary taste and some understanding of ancient to 19th century culture. Ok, enough bragging from me xD moving on

So as you imagine, I will have to model these characters. Well guess what, I already did. I want to talk a bit about the process and some tricks I developed to speed it up. Both characters took two days to model and I spent about 10 hours in total to do them both.
Starting with Z-brush, I first sculpted a high res plantman. Then retopo-ed and UV-ed it in 3d Coat. Getting him back in maya, I started adding the detail that will be on separate meshes (to ease skinning).

The hair, roses, thorns, leaves and so on was all made with CV curves in maya.

Moving on to scissorman,I did him from zspheres and there was no need to retopology, due the nature of his design- Just a bit of extra work in Maya to get the right amount of geometry where needed. I got to the conclusion that the bit that takes me the most time during modeling and is usually the most boring part is getting the topology of the hands right. So, I decided to make a set of hands to reuse in my pipeline, by just attaching them to the model. I made the first hand purely in Maya. It is as low poly as possible. Then I made 3 variations of it, each having a different number of vertices at the connection point- the wrist.


So I took one of them and just stitched it to scissorman and made some minor modifications in the shape. The topology is the best of what can be done on a non realistic character. I dont want to sound a bit arrogant by saying this and it usually happens when I am being critical, but I've seen ALOT of bad topology on hands on the internet. I know mine is no masterpiece too, but some of them real bad ones are being sold for a fortune at cg store websites. :D It's mind blowing. Have they no shame?


Moving on to UV mapping, I realized that I dont really need to use different space of one uv shell, if its going to be exactly the same as it's symmetrical counterpart. So when I uv-ed scissorman, I made sure that his left and right hands,arms, feet, and so on have the same uv shells. So after unwrapping them in Blender (of course- because its much much much better than maya at this) what I did was flip over and lay the left side uv shells over the right side ones. So the left and right hand of the character would occupy exactly the same place in UV space.

The one disadvantage of this is the obvious inability to be asymetrical with the texture.
The advantages are too good to pass on though- Not only do I have to paint only one side of the model at certain parts, but I get to give them all more UV space, more pixels for the texture!


The mocap data is going to be put into short loop sequences that can be used for a game. So the big picture is , if this works out nicely, we will be able to assemble a team of other students from gamings course and import this stuff in a mini UDK or other engine project. I am not going to go into detail about the game at this point, as it is not clear if it all will work out..
Friday, January 7, 2011

Piggybank animation WIP update

Happy new year , folks . :D

The deadline for the assignment is up and some of you might be wondering as to how far I am done with the piggy bank project. Well, I submitted the body animation - so I did what was expected of me by university. But having only body animation is not enough to tell a story and be satisfied with it. No, I continued working on the animation and have got a bit more than 3 minutes of animation by now- pure action body animation.

I tried to get the character to do as many different physical actions as possible, but while staying in character and telling the story. One of the most common mistakes of young animators is putting too much action too quick to the point where it gets confusing to watch. Another thing I tried to avoid is having a CG camera. I really wanted the camera to feel like its a real camera.

So let me start by crediting Shutter for the excellent screenshot+presentation tool that it is. A completely free piece of software that helps me save time from photoshopping, in order to present you with screenshots.


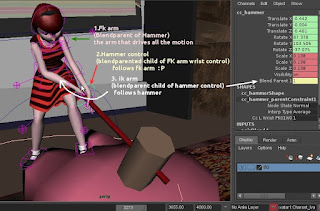
In this particular setup I am using what is known in Maya as the blendparent node.Whats beautiful about is the fact that I can directly parent constrain objects, while still having the ability to key them and have on/off switches - partial(rotation, translation, etc etc) and even to what degree is it affecting the object. Sounds confusing , but its really simple and what I get from it saves me hours. So in this setup to make her swing that hammer, all I need to keyframe is the left (fk) arm. I dont have to touch the hammer or the right (IK) arm, they just follow. And since the hammer is a natural extension of her arm, if we look at this as far as posing is concerned, its naturally fine to control its position and angle with the rotation of the left wrist. I picked FK to drive the hammer, because fk gives us nice clean arches. IK is a real pain in the neck. I found myself using IK only in cases where the character's hand must stay put on an object (pushing something, or hanging onto something). It might look like less work to beginner animators, but IK DOES NOT SAVE TIME in most cases :), but it does in some. The conclusion is that a rig must have BOTH or the animator is stuck spending much more time than needed. Ok moving on.

Speaking of arches, lets take a minute to appreciate the importance of having them clean and natural:

As you can see in the picture, I used maya's ghosting tool to keep track on the arches where needed.Its basically the 3d equivalent of onion skinning. On the right side of the screenshot, you can see the graph editor. I was extra careful with my curves this time. The stoneage animation really suffered because its timing was bad, but also the spacing had zero work put in it. So , after reading books, looking at tutorials and so on, I began to appreciate the power that I can get out of this spaghetti nightmare machine. It's really simple after one gets to know it better. For instance, I could offset a big number of poses by just moving their keyframes up/down in the graph editor (add more +X on that range of poses+controls, more +Y on the other range...) . Another example of neatness is the ability to just scale down an action- both in timing and poses. Are your poses too extreme? Select what you need in the graph and scale them down on the Y. That and so many other ways one can save time, makes it a BIG advantage over other animation methods. I can see now why adobe is bringing it to FLASH and appreciate that.


While animating, I noticed that I made her arms slightly too long. That might be both an advantage and disadvantage, but its not as bad as to force me to fix the model and rig. Should be fine to do it safely though, since its referenced and the animation data is kept in its own file.

Speaking of models, I felt somewhat creative and made these two flash viewers as promised:


The poses are not excellent, but one can at least take a nice look at the model.


Whats left now for me to do is add a couple of shots to finish the story and then do some more cleaning up in the graph editor,most notably the center of gravity control- thats the most noticeable thing.The controls that drive the action must have good curves this time. Also put the facial animations. For that part I already have a few tricks up my sleeve to save me hours of fiddling around. Bless R&D

Saturday, December 11, 2010

pbank animation 50% + the "Kinect" video project

I've been limited as to how much time i can spend on the piggy bank project, but there is seemingly hope that I will manage to finish it before the deadline (dec17). The storyboard that I had went through some revisions and now the film seems to be much more fun to work on. The Story is an important thing to me, working on something matters only when it has a meaning (or you get payed to do it lol, or in the best case- both). I am not going to spoil it too much though, so no animatic will be posted at this point. I even started reading a book on screen play writing!
Its still about buying shoes. I only made it a bit more unpredictable and imaginative.

Anyway, let's have a look at my current setup in Maya (ignore the poses- its WIP) :


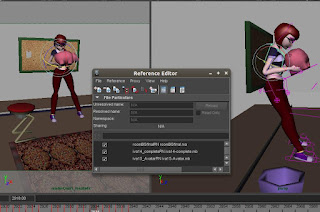
First of all- this time I am keeping my rigs, the background and props in separate files. The scene file contains only the keyframes, the camera rig and lights. That way I feel a little bit tidier/safer. Every time changes are made to a file while being referenced, maya stores them changes as nodes, it doesnt touch the rigs or whatever is referenced. But doing geometry/other changes to the items while they are referenced is not the best of ideas. Maya adds unneeded history to the scene file and it causes it to crash on loading in some cases, as I found out. Luckily, I could just open the file without loading its references, then go to the "reference changes list" and clean it up. Works beautifully now.

Second- the Camera setup is much better than the one i had for Stoneage. Its incredible how much more control one can get just by parenting the most normal cam to a simple locator.

For the animation- This time I have even less time to work on it, because of the greater number of side assignments and the part time job that i have. For the two weeks spent on it, I have worked very little on it, hardly full time. You can say only 2 days of the week full time and the rest- on and off for an hour or two. This time though, I feel more comfortable with the tools. I found ways to save time by using character sets+ selection sets. Its incredible how much of the frustration goes out the window with these.
I also took my time in research before putting a single keyframe! I have a big mirror in my room now, also shot some home videos of me doing stupid stuff (ended up hardly using that, but still fun)

The Background- I have uv-ed almost everything with Maya and painted the textures with Mudbox+photoshop/gimp.


With all this said, I want to assure everyone following the progress on this that I am certainly not going to abandon it at the deadline and leave it incomplete. I will continue polishing it and adding to it and then use that on a showreel. What I submit will have only body animation- no facial animation and no animation on the fingers, it will be rough. I think of not uploading it to the web yet, maybe just a playblast or two.

Ok, lets move on to the other assignment. This year I have a new module at university- Video production.


I worked in a team with 5 people to make a 2 minute film. I was assigned as the writer and director, but also ended up doing most of the editing in Final Cut pro. This proved to be a very good learning experience for me. I learned quite a lot about final cut pro, about the common mistakes that can be made when compositing, about the pitfalls of organizing a film. I have to say though, I enjoyed being a director on a live film. Not being supposed to build all the characters and sets and then "animate" everything. But it was hard to get the actor to do whats in my head. He didnt say some of his lines properly, we were missing a prop and I had to cut off some of the shots- as a result the story is a bit disjointed/inconsistent in the end. The blue screen had different tonal values, his clothes were dark and had some reflectivity - that made it a bit hard to clean up in post.
The film was shot in 5 hours. Here are some of the failed takes of some shots- just for the fun of it. :D
None of us had any prior experience with shooting life action. I wrote the story the day before- in half an hour. The sound should need some extra editing too.

Sunday, October 24, 2010

Summer ends and project Piggy bank


Well, I worked all summer. No, it wasnt for a studio or anything like it. So I couldnt get more good stuff to put in my portfolio. So there is a lot of catching up for me to do now.


My 2d and 3d animation (malfunction and Stoneage) were shown at a couple of festivals, one of which the Moscow festival of Contemporary Animation . Unfortunately their website is in flash, so in order to see my entry, you need to go to English>Participant2010> and I am under number 44


EDIT: Just received a honorary letter from the general Producer of the festival.


And while being at it, here is a screenshot of the finalists page of CG coach awards, where you will find me listed. I am putting it on a screenshot, just in case they take the website down.


Second year of university started and I've been busy doing all sorts of class assignments. Somehow inbetween the whole chaos, there is still time for me to have fun with new software.

Let me first start with whats my homework for this semester. A 30 second (tops!) 3d animated film featuring a girl lifting a heavy object. I already had two storyboards which I was eager to do, but then a certain someone decided that students should have less choice. So the tutor gave me a list of types of characters and things they can possibly do.
This was the one that:
a) everyone else was not doing
b) tolerable (one of them "auditioning for x factor" urgh and they expect me to do it without any voice/sound)

So I picked the girl scenario and quickly scribbled this storyboard literally a couple of hours before the deadline:
https://docs.google.com/fileview?id=0B4WmGlTeh8z8ZTJhOTg1N2ItYjBmMi00MzRlLTgyM2EtNWQ1ZmY3NGE2ZTE3
I still feel that the ending is weak. Maybe I can change it somehow.

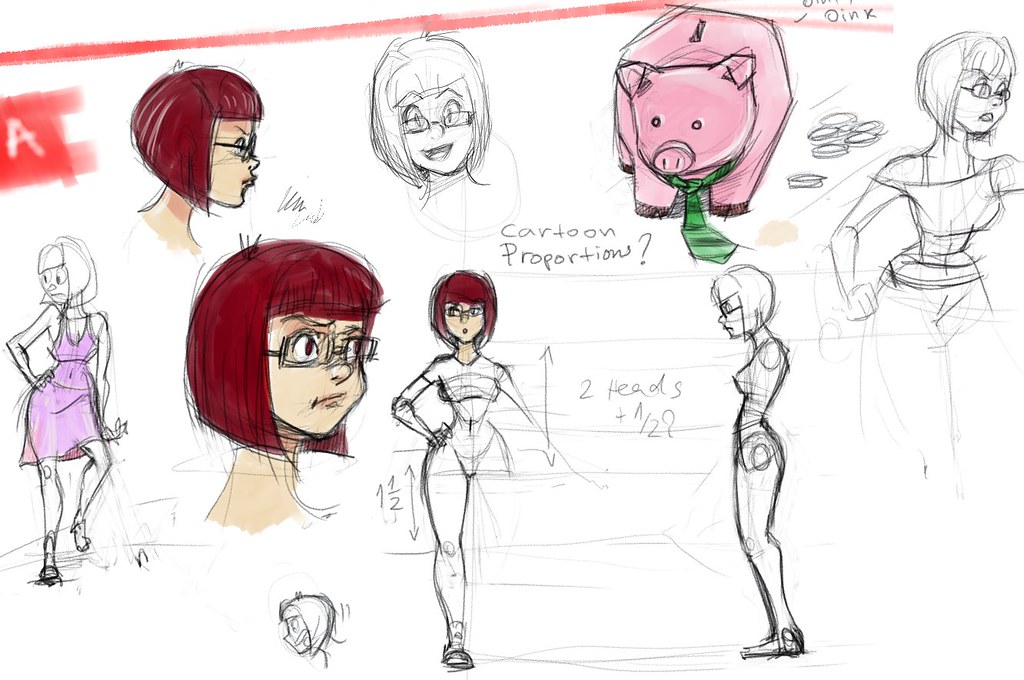
And here is the concept art that I made:


Made with my favorite open source painting app- Mypaint

And then I modeled the girl with zbrush, fixed her topology on the hands and added detail in Maya. The retopology tool in zbrush 3 would create holes in the area of the hands. So the easiest approach there is to just do the tricky parts in Maya or blender.

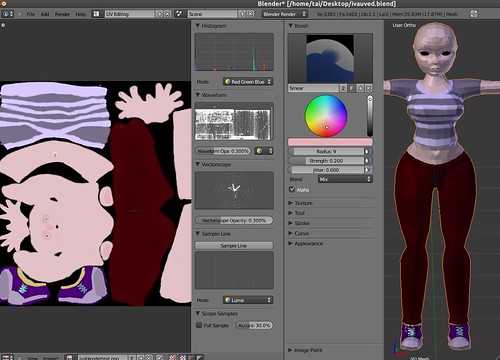
Next on is UV mapping and texturing. Since the character is with a cartoony design, I decided to avoid putting much realistic details. With 3d its very easy and tempting to make the model pointlessly detailed, but less can be more in this case. UV mapping and texturing was done in Blender 2.54 and took a couple of hours.

Blender-uvSeamsScreenshot

I decided to give the new Blender a try, because it has some tools that are better than Maya's at the moment. Uv unwrapping and sculpting mode are especially nice in blender. My hope to see a better sculpting mode in Maya is almost nonexistent since Autodesk also owns Mudbox and likes it when people keep buying it.:P So yeah, its also 0$. Of course it has some annoyances and quirks, but the more I use it the easier it gets. Texturing mode in blender lacks symetry, or at least I couldnt find it. Also pressure sensitivity for my tablet model didnt work, so I made the simplest most basic texture possible.

blender-polypainting

Her shape still needs some tuning. I will use belnder's sculpting mode to fix the hips/legs and head. I noticed that when I import it and soften the edge normals in Maya, her proportions look kind of different to the eye. That might need some adjusting too.

My goals with this animation are:
-learn Blender 2.5 and integrate it in the pipeline (70% done- I need to learn more)
-use maya dynamics - Maya hair or Maya cloth, but keep it very cheap on CPU/render time. Do that after the animation is complete.
Deadline is till the end of semester one. This new knowledge will help me create the next project- a storyboard that I've been working on for a while now.