nav2

Showing posts with label modelling. Show all posts

Sunday, August 25, 2013

maternity app - freelance job

A month ago I got hired to do a job through the working academy. Since they don't require signing an nda, it's possible for me to make a post here.
My task was to Model and rig a mother and a baby + some of the organs of the mother. This is to be used in a maternity educational app on android devices.

The client's target art style was pretty much in copying this picture they found on shutterstock:

So at first I was told that the models are to be pre-rendered- I made them high res. Then it was decided that the models should run animated in real time within the app.
So then reduce their poly count. Luckily when I initially modeled them, they were designed to work with a subdivision modifier to get their final "smooth" look so reducing the poly count wasn't hard.

They required the mother's face to be neutral - not belonging to any specific ethnicity or having too much character. Realizing that this neutrality is very much determined by the shader's properties as well as the shape, I decided to use a material that is as close to the target art style as possible. It was also important for this material to be game friendly. Creating a matcap(inkscape) allowed me to achieve the look in real time in the opengl viewport. Unity has a matcap shader, so in theory this should run in the game engine.In any case having this for previewing purposes helped me sell the model and get it approved. I needed to first pitch the approach - at the time thinking they will be prerendering the animations:

The woman is using a matcap (or any shader that gets similar look- it can be a  ramp shader) The material is really not transparent, but the organs are showing on top of the mesh, even though they are inside it in terms of 3d space.The rim light and the subtle darker tone towards the middle of the matcap sphere helps reinforce the illusion that the mesh is transparent.
In blender its a matter of toggling "xray" for the organs geometry in their viewport render attributes. Maya is a similar story. You can alternatively use passes and composit them together (if you are doing prerendered clips).

It was suggested to simply use a transparent shader. I tried it and found some practical issues with that approach:

Both characters are based on a man mesh I made a few months ago. Reusing geometry is a nice way to save time in some cases. I still had to change the edgeflow to follow some curves better.
At the first pass the client requested to reduce the blocky-ness on the buttox of the woman. So I added more topology where it was needed to be more curved.
Modelling the baby was more challenging, because it was important for it to have that "newborn" look. There was a lot of play with proportions.
Dominique Lane provided concept art images for reference. I followed those closely as it was what the client approved. They later decided to remove the hair for the woman. For the organs there were references on the web. Dom provided concept art for those as well. I Looked at lots of pictures of babies and pregnant women. The poly count can be reduced more but was told to stop doing that :D
In total ALL the models(+organs) in the scene are 17 000 triangles. But all of the models are not going to be visible at all times.

The organs are made using lots of modifiers, making them easy to edit later on, while also being low poly. Blender has a nice "decimate" modifier that can  non destructively reduce poly count- it's not ideal for everything, but it's handy in a few cases such as irregular static shapes. If you want to keep your mirror modifier, but still have some asymmetry, you can combine it with a simple latice modifier.


Rigging and skinning was the easiest part, because it didn't need approval from the client.It took a day for both with a rigging script- skinning taking the majority of the time.

A big part of this job for me was communicating with the client and the other team members, waiting for feedback, asking questions that weren't answered in the brief, etc.

For the model of the mother is good to note that they required a pregnant and non pregnant version. To achieve that I gave her a "belly" controller that is driving a joint. It is completely possible to animate her pregnancy progression by scaling/moving/rotating it. The skinning was a big part of getting that part right. Unity and most game engines don't do blendshapes very well or it is too expensive as far as I know.
This project was a slightly weird experience, that was still enjoyable. Here's hoping that it will find it's way to an android device! That part depends on the rest of the team.

Tuesday, January 8, 2013

Soda trip - modelling The Dude


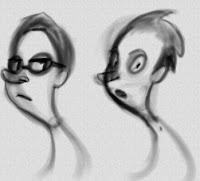
for the character design:
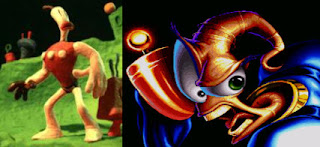
I used to draw Klayman and Jim ALOT when I was a little kid - Even had a few fan made comics of Jim and Sonic. So the Dude is inspired by those characters to a certain degree. Being so, it was great for me to revisit them and see how they move - how the joints deform their mesh. 


Lack of chin will change the way this character is moving his head. Must avoid drastic joint rotations (90 degrees) to avoid breaking the line of action!!I played the idea of having the Dude wear glasses - so he looks more like a writer.
"The Dude" is a working name- reference to Big Lebowski.


Goals of design:
  • Achieve curvy line of action within the spine
  • A silhouette that "flows", avoiding symetry and parallel lines, avoid mirror symetry as well 
  • appeal with directional force


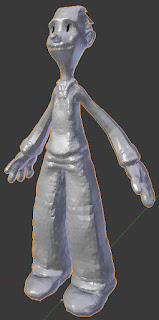
This guy was made with a skin modifier in blender, which is just like zspheres in zbrush. From there he was sculpted with dynamic topology on (it's much like what sculptris has), so I didnt have to worry about geometry and could focus on the shape and the design. Having the grease pencil allowed me to scrible over the mesh and sort of imagine how it would look like when I start to texture it.
The design from the sketch changed a bit in order to work better in 3d. I admit that the eyebrows area and the nose was a bit inspired by Aardman.


When you model characters it's definitely somewhat beneficial to have some rigging and skinning experience.I wrote some notes as to how they are going to deform. While modelling them, the topology and proportions were based on those notes.
It also became more and more clear what the rigs would need.

I write notes in a sort of a journal that is backed up on dropbox. But it's good to share some of the stuff with the world, to get feedback and keep it open.

Here are some notes on character modelling and the the neutral pose:
  • Arms and legs should be slightly bent so the IK solver knows the direction.
  • They should be bent only on one axis- if you bend the joint that the IK will affect on 2 axis, that forces the ik to slightly offset its original rotation during application.
  • The spine sort  of bends both positively and negatively from its original axis,and also on more than one axis, so it's easier if that geometry is not posed at all and remains straight before skinning.
  • when you model the fingers, the legs and other parts that are close together, try to give them some space so you dont get joints from one limb affecting the geometry of other limbs
  • Split parts of the geometry that don't really need to be skinned and you can just parent them to something- it will save your computer some cpu hopefully, but also reduce some of your workload. Keeping things simple when its possible.
  • Give enough edgeloops for deformations to happen accordingly, dont place any poles where a character will likely deform visibly
On retopology:

The first thing I did was reuse the topology created by the skin modifier and clean it up from weird poles and weird edge flow.
The shrinkwrap modifier forced it to readjust itself to the tweaks I made during sculpting.I completely deleted the skin modifier's head geometry as its topology was a mess. It's often easier to start over than try to fix a mess.

The hands were an area that needed a considerable amount of cleaning up, eventhough the skin modifier gave a decent starting point.

Added nice bevels on his upper body to catch that highlight and give him that blocky hard edges look. I considered how he would deform and gave him enough edgeloops at the joint areas. Since he will have more of a 1920's cartoon rubber hose deformation on his limbs, I had to spread the loops a bit more there.

I tried to avoid adding topology where its not needed to define the shape, however that left some star shapes. It's generally a good rule to hide these poles where you would expect the model to crease anyway or areas where it won't deform much..

It's good practice to have an even number of vertices at edge loops  of limbs that need to be closed (feet,fingers,etc). That doesn't count for loops that are in the middle axis, since by default the mirror modifier will multiply verts in middle loops by two (the neck,the torso,etc).

The face needed bevels to keep his "blocky" hard surface edges from the original design. This screenshot shows what I start with for a foundation when I retopo the head. Much like what many others do, I would first lay my edgeflow down and edgeloops. In this design scenario case one thing to consider again for his head was the bevels from his upper body continued on his face- to keep the blocky look from the original design.

He takes off his shoes during the beach part and the hair gets messier, his sleeves change too. For that reason I made an extra hair mesh to put on top of the tidy one.The shoes and sleeves are a separate mesh from the body so that is going to be replaced when needed. The head is a separate mesh too.


For the Bird


I used a very similar approach.The design was researched - my journal contains a big number of bird pictures from google image search- pasted from clipboard straight into the notes. Asked some friends which one they like and number 2 came out as the favorite.


Wasn't completely sure how to do the neutral pose, as this is the very first time I do a bird. But we'll see how it goes when we get to the rigging stage.

Wednesday, February 2, 2011

some models for the mocap and progress on pbank

The animation of piggy bank has gotten a bit longer than expected. The plan was 2 minutes and now its getting a little longer than 4. Truth be told, I hardly work on it lately because of all the other assignments and the part time jobs (I have two of them would you believe it). My plan is to render it when its absolutely perfect. If this was my job and I was getting my bills paid while working on it every day, I am pretty sure it would have been ready ages ago! It's the polishing that eats most of the time- getting those curves and the timing to work well. I am still relatively new to this 3d animation business, but that doesnt stop me from having high standards and be critical with the work.

You see, its not perfect and when its not perfect, I just dont render and post it. :)

It will be probably ready for the festivals this year, so anyone interested to send/suggest invite for events, please feel free to drop an email with the info.I do appreciate that sort of attention :)

The Mocap assignment
So this semester I signed up for one extra module that I believe will be a good addition to my portfolio, especially if I apply for work as an animator for video games. Motion Capture has been around for quite a while now in industry and we've all seen plenty of good ,bad and ugly examples of its use. My personal opinion about it is more or less the same as any other I've heard from classic animators. The truth is that the moCap data is often awkward when applied to the body of a character. I believe that is due to a number of reasons- one being the movement of the actor (often not an actor) not fitting the design of the character.The timing of the movement is too realistic and snappy, it has some random rubbish that needs to be cleaned up (like random gestures). It will never be able to replace good old fashioned animation, but it certainly will continue to be part of what industry needs, especially for sports games. What I hate about the majority of Mocap is just it's mediocrity and genericness.Generic people doing generic things- fighting, running with guns,doing some sports... That is why my goal with this module will be to give character to my characters, make them unique!

Speaking of the that, let me start by introducing them :

yet another character that I designed and modelled- I call him scissorman
Scissorman aka The Sepia Baron
I created this character as a tribute to classic horror game "Clock Tower".. You might notice my strange obsession with stripes is present here as well. He is kind of like a limping clown. The scissors are there to cut off the next character's head off.

rose creature concept
Plant man aka "The scarlet torn" is a character that I created a year ago. The idea for him came from my obsession with venecian masks+ Edgar Alan Poe's short story
I studied Philology back at the university of my country years ago, so that helped me develop some literary taste and some understanding of ancient to 19th century culture. Ok, enough bragging from me xD moving on

So as you imagine, I will have to model these characters. Well guess what, I already did. I want to talk a bit about the process and some tricks I developed to speed it up. Both characters took two days to model and I spent about 10 hours in total to do them both.
Starting with Z-brush, I first sculpted a high res plantman. Then retopo-ed and UV-ed it in 3d Coat. Getting him back in maya, I started adding the detail that will be on separate meshes (to ease skinning).

The hair, roses, thorns, leaves and so on was all made with CV curves in maya.

Moving on to scissorman,I did him from zspheres and there was no need to retopology, due the nature of his design- Just a bit of extra work in Maya to get the right amount of geometry where needed. I got to the conclusion that the bit that takes me the most time during modeling and is usually the most boring part is getting the topology of the hands right. So, I decided to make a set of hands to reuse in my pipeline, by just attaching them to the model. I made the first hand purely in Maya. It is as low poly as possible. Then I made 3 variations of it, each having a different number of vertices at the connection point- the wrist.


So I took one of them and just stitched it to scissorman and made some minor modifications in the shape. The topology is the best of what can be done on a non realistic character. I dont want to sound a bit arrogant by saying this and it usually happens when I am being critical, but I've seen ALOT of bad topology on hands on the internet. I know mine is no masterpiece too, but some of them real bad ones are being sold for a fortune at cg store websites. :D It's mind blowing. Have they no shame?


Moving on to UV mapping, I realized that I dont really need to use different space of one uv shell, if its going to be exactly the same as it's symmetrical counterpart. So when I uv-ed scissorman, I made sure that his left and right hands,arms, feet, and so on have the same uv shells. So after unwrapping them in Blender (of course- because its much much much better than maya at this) what I did was flip over and lay the left side uv shells over the right side ones. So the left and right hand of the character would occupy exactly the same place in UV space.

The one disadvantage of this is the obvious inability to be asymetrical with the texture.
The advantages are too good to pass on though- Not only do I have to paint only one side of the model at certain parts, but I get to give them all more UV space, more pixels for the texture!


The mocap data is going to be put into short loop sequences that can be used for a game. So the big picture is , if this works out nicely, we will be able to assemble a team of other students from gamings course and import this stuff in a mini UDK or other engine project. I am not going to go into detail about the game at this point, as it is not clear if it all will work out..