nav2

Showing posts with label rigging. Show all posts

Sunday, August 25, 2013

maternity app - freelance job

A month ago I got hired to do a job through the working academy. Since they don't require signing an nda, it's possible for me to make a post here.
My task was to Model and rig a mother and a baby + some of the organs of the mother. This is to be used in a maternity educational app on android devices.

The client's target art style was pretty much in copying this picture they found on shutterstock:

So at first I was told that the models are to be pre-rendered- I made them high res. Then it was decided that the models should run animated in real time within the app.
So then reduce their poly count. Luckily when I initially modeled them, they were designed to work with a subdivision modifier to get their final "smooth" look so reducing the poly count wasn't hard.

They required the mother's face to be neutral - not belonging to any specific ethnicity or having too much character. Realizing that this neutrality is very much determined by the shader's properties as well as the shape, I decided to use a material that is as close to the target art style as possible. It was also important for this material to be game friendly. Creating a matcap(inkscape) allowed me to achieve the look in real time in the opengl viewport. Unity has a matcap shader, so in theory this should run in the game engine.In any case having this for previewing purposes helped me sell the model and get it approved. I needed to first pitch the approach - at the time thinking they will be prerendering the animations:

The woman is using a matcap (or any shader that gets similar look- it can be a  ramp shader) The material is really not transparent, but the organs are showing on top of the mesh, even though they are inside it in terms of 3d space.The rim light and the subtle darker tone towards the middle of the matcap sphere helps reinforce the illusion that the mesh is transparent.
In blender its a matter of toggling "xray" for the organs geometry in their viewport render attributes. Maya is a similar story. You can alternatively use passes and composit them together (if you are doing prerendered clips).

It was suggested to simply use a transparent shader. I tried it and found some practical issues with that approach:

Both characters are based on a man mesh I made a few months ago. Reusing geometry is a nice way to save time in some cases. I still had to change the edgeflow to follow some curves better.
At the first pass the client requested to reduce the blocky-ness on the buttox of the woman. So I added more topology where it was needed to be more curved.
Modelling the baby was more challenging, because it was important for it to have that "newborn" look. There was a lot of play with proportions.
Dominique Lane provided concept art images for reference. I followed those closely as it was what the client approved. They later decided to remove the hair for the woman. For the organs there were references on the web. Dom provided concept art for those as well. I Looked at lots of pictures of babies and pregnant women. The poly count can be reduced more but was told to stop doing that :D
In total ALL the models(+organs) in the scene are 17 000 triangles. But all of the models are not going to be visible at all times.

The organs are made using lots of modifiers, making them easy to edit later on, while also being low poly. Blender has a nice "decimate" modifier that can  non destructively reduce poly count- it's not ideal for everything, but it's handy in a few cases such as irregular static shapes. If you want to keep your mirror modifier, but still have some asymmetry, you can combine it with a simple latice modifier.


Rigging and skinning was the easiest part, because it didn't need approval from the client.It took a day for both with a rigging script- skinning taking the majority of the time.

A big part of this job for me was communicating with the client and the other team members, waiting for feedback, asking questions that weren't answered in the brief, etc.

For the model of the mother is good to note that they required a pregnant and non pregnant version. To achieve that I gave her a "belly" controller that is driving a joint. It is completely possible to animate her pregnancy progression by scaling/moving/rotating it. The skinning was a big part of getting that part right. Unity and most game engines don't do blendshapes very well or it is too expensive as far as I know.
This project was a slightly weird experience, that was still enjoyable. Here's hoping that it will find it's way to an android device! That part depends on the rest of the team.

Wednesday, March 13, 2013

Some good practices in rigging

Getting closer now to my gant chart's deadline for Superfrog reboot game, I have to now rig and animate the 3 low poly enemy characters that I made.

I am going to take the opportunity and talk about some of the good practices in rigging that I learned and borrowed from other riggers.

Divide your rig into two systems- a motion skeleton and a deformation skeleton

From previous posts I made on the subject, you will find that some of the good rigging scripts out there have this feature.
 I used advanced skeleton on 2 of the 3 rigs.

Following this sort of a rigging model, I decided to give the hedgehog some love and rig it myself from scratch!
It took an hour or so to get it done, and I came up with the rig as I went- so it's not the greatest rig- it's pretty simple.

So first I made a motion system skeleton and rigged that (in yellow). Nothing special- just 4 IK handles for the legs, so I can move his body up and down while the feet are on the ground.
I also made a squash/stretch joint and hooked it to a controller. The controller uses set driven key to squash the body when i move it down and stretch it when moving it up- just like you would with a ball rig.
The jaw and the ears are aim constrained to cv controllers.

Then I duplicated my motion skeleton (after testing it) and called that copy - deformation skeleton. Cleaned it up from any copied constraints.
Then I parent (and on some joints scale) constraint all the deformation bones to their motion bone equivalents- motion joints controlling deformation joints. Now since one skeleton was totally overlapping the other, I moved them to their own layers(on the right panel - colour coded it in red).

Then I skinned the character mesh to the deformation skeleton.
Now if you look at the screenshot, you will see that wherever there is a red bone showing- that is where the differences between the deformation rig and the motion system start:


1. his legs on the deformation system have one joint less each- since those are no longer needed by the ik handle - they are drivven by the motion system legs that have ik handles.

2. His tail initially had 2 joints. Since he is a character to go to a game engine, I changed my mind after skinning it and took out one joint, even though I have animations over it.
The nice thing is that even if you remove moving joints in the deformation system, your animation doesnt get affected at all, it's just not going to be exported. If I want to bring it back, all I have to do is add that joint back and parent constraint it to the motion system joint that actually has the movement coming from a control curve.

So deformation rig has 5 joints less in total. 5 joints less for the games engine.
I can also potentially get rid of all the 9 end joints (no skin weights on them), which leads us to 14 joints less for the engine.

Essentially you can remove any deformation joints without damaging the motion system.
And vice versa- one can add new motion controls without damaging the existing deformation joints/skin weights. Simplifies things!

3. If you look at Squash stretch joint, you will find that the deformation one is placed lower than the motion one.
Since the motion system squash stretch joint only drives the scale of it's deformation system twin, It's easy for me to remove it's influence, move it anywhere on the model(the pivot of squashing and stretching is at the bottom, not the middle of the body) and rebind it.
4. The body is skinned to the squash/stretch bone. The root joint has no influence on the mesh and can be instead driven as a global controller in the games engine.I might have to change it around a bit later, but having the rig split into two systems will make life easy in doing that :)


Tidy outliner structure- easy to reverse engineer
I like the outliner tidy! All ik handles have their own group. All the controllers have their own group with nothing but cv curves in it. Everything is in the globalScale group. The global controller is out of that group since it is parnet/scale constraining it.
It's important to be tidy, as it makes life easier in the long term- say they ask you to add new features to the rig or debug the rig.The less one has to dig through long lists and hierarchies to get to something, the better.

Leave some offset space with your constraints
By this I mean that it's good to have something like a group between a driver of a constrain and it's target. When you constrain something, you can no longer put keyframes on it (the blendparent node is another story) - It's hard to add some offset to that motion. More often than not animators like to tweak things, so it's always nice to leave that control available, even if you locked and hid it temporarily not to confuse them.
So what you see in good rigs is this tendency of putting the target object in a group and constraining that group instead of the target object- you get an extra pivot. Using the motion-deformation rig approach gives you that added bonus and keeps the outliner tidy.
It's an especially important rule, when you rig props that the character interacts with.


Monday, November 15, 2010

pbank - rig done

I finished this rig a couple of weeks ago, but since I had other university assignments and part time work I couldnt do much on the skinning process for a while. It took about a week to learn all the new stuff and make this rig.


The previous human rig that I made had some disadvantages. One mainly being the spine area. When animating the cave man, I quickly found out that too much twisting would cause collapsing in the geometry where the joints are. So this time I did my research and tried other rigs. That led me to what Digital tutors' Delano has in their latest dvd. It's called n-spine and it manages to do the trick beautifully while also being relatively simple to set up.Here is an example of a twisting spine:

Another great thing about this rig has to be the fact that everything has "follow" switches. If I move the torso, the head and arms will follow now!


While i wasnt supposed to make any facial controls,I kind of did it anyway. I wanted to practice that more. The previous models that I made felt kind of limited in that regard. So I sat down and looked at my own face doing weird expressions, figuring out how the muscles are pulling the skin, also remembering everything i know from observational drawing...
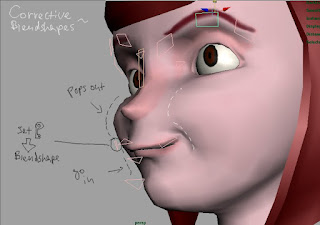
I am a big believer in trial and error learning. So I challenged myself yet again, deciding to make a face rig that is simple, yet effective, no blendshapes. All the controls are on the face itself, since its easier to access them like that.

This face rig is quick,experimental and a bit messy. The eyebrows are made of just a bunch of joints.


The mouth is purely my work of fiction and it's made out of joints too:

(top lip,bottom lip, left and right
lip)+ a couple of corrective blend shapes
The left and right joints of the lip have set driven keys on rotation. As I move them on Y, a rotation is triggered to put a small twist. as I move them closer together, that triggers a corrective blendshape to stop the geometry from collapsing and keep the volume in the lips


The jaw can go backwards and forwards( appart of up and down) , just like a real jaw..


when she smiles, the cheeks would come out a bit through the magic of set driven key:

The system is not perfect. I might need to do some work on the weights.It's biggest advantage is the low number of controls and the power you get out of them.


The less you have to keyframe to get what you want, the better! This is basically my mantra now. If its possible to get the same amount of flexibility with something that is simple and straightforward, I will go through fire and ice to get it to work right.This applies for facial animation the most. I will probably do my rig with only blendshapes next time though. This painting of weights of joints on the face was a real pain in the neck.

Things to note when it comes to skinning:
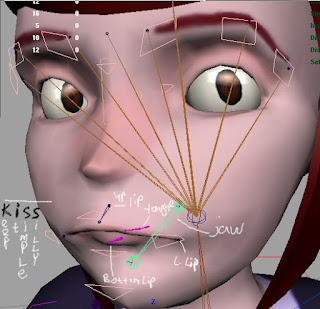
Keep the inside of the mouth as a separate mesh, if you dont want to waste time getting the weights there right. One common problem when skinning is when the interior of the mouth comes through the surface of the skin. I really hate painting weights, so I didn't spend too much on that part. One of the most annoying parts for me personally is getting the weights on the fingers right.
As you can see from the picture, the eyebrows and the lips may need some more work when it comes to skinning xD


Saving time~
The rig is the thing that takes most of the time in the pipeline, so I am looking into automating the process and even reusing what I can on the next model. I learned how to copy weights from one model onto another,so I can use the same rig on models with similar proportions/posture. But doesn't solve the problem. 3ds max and blender have automated rig generators. maya has mel scripting and plug-ins. The best one out there has to be the setup machine.
If I was to do this in a short deadline, I would go for the setup machine and just customize the rig that it generates.Thats what i did with the mammoth rig and it worked out beautifully. Tsm is very very flexible!

The only reason that I keep doing it manually is because I want to learn how it all functions under the hood. Having problems and resolving them is the best way to acquire experience.

I know that for this uni assignment I will probably not need a lot of the controls that I have here. When I start doing something for a second time, and there is nothing at stake,but my time- then it's best to try to do it in new ways. It is so tempting to stray from the standard path and see if there's another better solution to each problem. It's just never perfect. Some people are telling me that I might become a generalist if I keep going like that- trying new software and techniques. But I will always think that doing that is giving me an edge over anyone who sticks to only one way, one software. It's just not good to be too satisfied with something when there's always a new way to do it better,faster, simpler.

Animation:
Last time I did my animation in maya, I was really messy. Since then, I've managed to learn more about the graph editor, tweening and generally how to do it properly.
I will try to put up another 3d viewer thingy for Eve in the next post

Monday, March 29, 2010

backgrounds and props wip

I went through some of the things that must be done in order to get the technical things aside and be able to focus on the creative when I start animating.

There are numerous cosmetic fixes and changes here and there on both characters, their skinning and controls. There is no reason to post pictures of that now, because I will show it later on anyway.

The new things that I made are the spear weapon( with it's controls ), and some of the elements of the backgrounds. I am also compositing the shots right now and thinking about the background and it's colors.

The spear was really easy to make in maya, and I also Uv-ed it in maya and made the texture with photoshop. Here are the controls that I made for it:


And here are the background elements this far:


Ignore the ugly procedural textures- I am going to change them later. Almost everything is made out of nurbs curves, circles, bend deformers and so on. There is a lot of duplicating and variating going on too.. but I think this will do,after I put some nicer textures

Sunday, March 21, 2010

mammoth -the set up


I finished the Mammoth character set up yesterday and while skinning frustrated me at first, I managed to get it done way faster this time. Thanks to some help I got at university. I am getting a lot of valuable feedback from more experienced students at uni. Anyway, here are some shots I took yesterday:


There are several blend shapes used this time. I got some assymetrical face expressions controls on the brows and the cheeks put into single controllers.


I like having one control do as much as possible. That simplifies the work later on. These characters are far from perfect, there is still a lot to learn. But I guess that they will do for this animation short.

Thursday, March 18, 2010

Cave dude - the set up

I finished the cave man's set up completely a couple of days ago, but forgot to rant about it. There is still more to desire in regards to the skinning, but meh..

Here are some of the controls that I have set up. I know its pretty basic but it's my first rigging/skinning work ever. Took less than a week...


And while being at it, I guess I will also show you my progress on the other character. Just to experiment,I decided to use a mel script to generate a rig for me this time. It's called the setup machine2...But of course what I got out of it was overcomplicated and had some joint orientation issues.,so I deleted half of the rig (legs) and redid them myself. That also took care of the skinning issue it gave me.


blend shapes are prepared for applying after i get the weights right...