I am going to take the opportunity and talk about some of the good practices in rigging that I learned and borrowed from other riggers.
Divide your rig into two systems- a motion skeleton and a deformation skeleton
From previous posts I made on the subject, you will find that some of the good rigging scripts out there have this feature.
I used advanced skeleton on 2 of the 3 rigs.
Following this sort of a rigging model, I decided to give the hedgehog some love and rig it myself from scratch!
It took an hour or so to get it done, and I came up with the rig as I went- so it's not the greatest rig- it's pretty simple.
I also made a squash/stretch joint and hooked it to a controller. The controller uses set driven key to squash the body when i move it down and stretch it when moving it up- just like you would with a ball rig.
The jaw and the ears are aim constrained to cv controllers.
Then I duplicated my motion skeleton (after testing it) and called that copy - deformation skeleton. Cleaned it up from any copied constraints.
Then I parent (and on some joints scale) constraint all the deformation bones to their motion bone equivalents- motion joints controlling deformation joints. Now since one skeleton was totally overlapping the other, I moved them to their own layers(on the right panel - colour coded it in red).
Then I skinned the character mesh to the deformation skeleton.
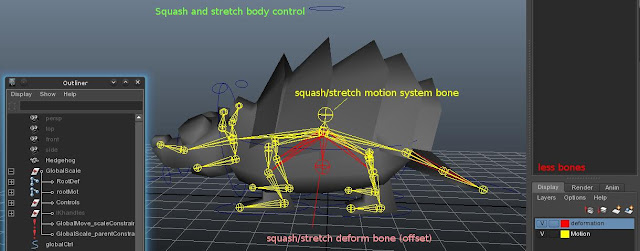
Now if you look at the screenshot, you will see that wherever there is a red bone showing- that is where the differences between the deformation rig and the motion system start:

1. his legs on the deformation system have one joint less each- since those are no longer needed by the ik handle - they are drivven by the motion system legs that have ik handles.
2. His tail initially had 2 joints. Since he is a character to go to a game engine, I changed my mind after skinning it and took out one joint, even though I have animations over it.
The nice thing is that even if you remove moving joints in the deformation system, your animation doesnt get affected at all, it's just not going to be exported. If I want to bring it back, all I have to do is add that joint back and parent constraint it to the motion system joint that actually has the movement coming from a control curve.
So deformation rig has 5 joints less in total. 5 joints less for the games engine.
I can also potentially get rid of all the 9 end joints (no skin weights on them), which leads us to 14 joints less for the engine.
Essentially you can remove any deformation joints without damaging the motion system.
And vice versa- one can add new motion controls without damaging the existing deformation joints/skin weights. Simplifies things!
3. If you look at Squash stretch joint, you will find that the deformation one is placed lower than the motion one.
Since the motion system squash stretch joint only drives the scale of it's deformation system twin, It's easy for me to remove it's influence, move it anywhere on the model(the pivot of squashing and stretching is at the bottom, not the middle of the body) and rebind it.
4. The body is skinned to the squash/stretch bone. The root joint has no influence on the mesh and can be instead driven as a global controller in the games engine.I might have to change it around a bit later, but having the rig split into two systems will make life easy in doing that :)
Tidy outliner structure- easy to reverse engineer
I like the outliner tidy! All ik handles have their own group. All the controllers have their own group with nothing but cv curves in it. Everything is in the globalScale group. The global controller is out of that group since it is parnet/scale constraining it.
It's important to be tidy, as it makes life easier in the long term- say they ask you to add new features to the rig or debug the rig.The less one has to dig through long lists and hierarchies to get to something, the better.
Leave some offset space with your constraints
By this I mean that it's good to have something like a group between a driver of a constrain and it's target. When you constrain something, you can no longer put keyframes on it (the blendparent node is another story) - It's hard to add some offset to that motion. More often than not animators like to tweak things, so it's always nice to leave that control available, even if you locked and hid it temporarily not to confuse them.
So what you see in good rigs is this tendency of putting the target object in a group and constraining that group instead of the target object- you get an extra pivot. Using the motion-deformation rig approach gives you that added bonus and keeps the outliner tidy.
It's an especially important rule, when you rig props that the character interacts with.


No comments:
Post a Comment