One of the university modules in this semester had for an (optional) assignment the research of reusing character rigs and animation to be imported to a game's engine.
I was given a deadline to write a greenlight pitch, a research paper (almost 30 pages!) and then create a technical demo video.
It's pretty much do it yourself sort of a thing set by university(just as many other things).
In this case before even delving into reusing animation clips, I decided that it's more important to find out what exactly are the best practices in character rigging and animation for game engines - where the data has to be created in a specific way that will make it friendly to use by the programmers and the engine.
In the research paper I used for sources the excellent presentations on animation in Uncharted 2 by naughty dog, among other things.It was a bit rushed so It got me 64.4% .
For the video, I used kdenlive to put together a quick overview of the findings of experimenting with some of the tools in Maya:
The paper and the video focus on the work that is done in the animation package rather than the game engine. I have in the past done character modelling, rigging and animation for Unity 3d. That first experience was a bit of a trial and error - the animation data needed to fit with how the character actor is scripted.It's something that I will keep fo a future post, until there is time to put together a demo of that game.
I finished this rig a couple of weeks ago, but since I had other university assignments and part time work I couldnt do much on the skinning process for a while. It took about a week to learn all the new stuff and make this rig.
The previous human rig that I made had some disadvantages. One mainly being the spine area. When animating the cave man, I quickly found out that too much twisting would cause collapsing in the geometry where the joints are. So this time I did my research and tried other rigs. That led me to what Digital tutors' Delano has in their latest dvd. It's called n-spine and it manages to do the trick beautifully while also being relatively simple to set up.Here is an example of a twisting spine:
Another great thing about this rig has to be the fact that everything has "follow" switches. If I move the torso, the head and arms will follow now!
While i wasnt supposed to make any facial controls,I kind of did it anyway. I wanted to practice that more. The previous models that I made felt kind of limited in that regard. So I sat down and looked at my own face doing weird expressions, figuring out how the muscles are pulling the skin, also remembering everything i know from observational drawing...I am a big believer in trial and error learning. So I challenged myself yet again, deciding to make a face rig that is simple, yet effective, no blendshapes. All the controls are on the face itself, since its easier to access them like that.
This face rig is quick,experimental and a bit messy. The eyebrows are made of just a bunch of joints.
The mouth is purely my work of fiction and it's made out of joints too:
(top lip,bottom lip, left and right
lip)+ a couple of corrective blend shapes
The left and right joints of the lip have set driven keys on rotation. As I move them on Y, a rotation is triggered to put a small twist. as I move them closer together, that triggers a corrective blendshape to stop the geometry from collapsing and keep the volume in the lips
The jaw can go backwards and forwards( appart of up and down) , just like a real jaw..
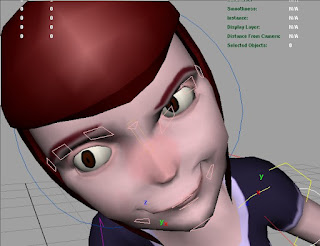
when she smiles, the cheeks would come out a bit through the magic of set driven key:
The system is not perfect. I might need to do some work on the weights.It's biggest advantage is the low number of controls and the power you get out of them.
The less you have to keyframe to get what you want, the better! This is basically my mantra now. If its possible to get the same amount of flexibility with something that is simple and straightforward, I will go through fire and ice to get it to work right.This applies for facial animation the most. I will probably do my rig with only blendshapes next time though. This painting of weights of joints on the face was a real pain in the neck.
Things to note when it comes to skinning: Keep the inside of the mouth as a separate mesh, if you dont want to waste time getting the weights there right. One common problem when skinning is when the interior of the mouth comes through the surface of the skin. I really hate painting weights, so I didn't spend too much on that part. One of the most annoying parts for me personally is getting the weights on the fingers right.
As you can see from the picture, the eyebrows and the lips may need some more work when it comes to skinning xD
Saving time~ The rig is the thing that takes most of the time in the pipeline, so I am looking into automating the process and even reusing what I can on the next model. I learned how to copy weights from one model onto another,so I can use the same rig on models with similar proportions/posture. But doesn't solve the problem. 3ds max and blender have automated rig generators. maya has mel scripting and plug-ins. The best one out there has to be the setup machine. If I was to do this in a short deadline, I would go for the setup machine and just customize the rig that it generates.Thats what i did with the mammoth rig and it worked out beautifully. Tsm is very very flexible!
The only reason that I keep doing it manually is because I want to learn how it all functions under the hood. Having problems and resolving them is the best way to acquire experience.
I know that for this uni assignment I will probably not need a lot of the controls that I have here. When I start doing something for a second time, and there is nothing at stake,but my time- then it's best to try to do it in new ways. It is so tempting to stray from the standard path and see if there's another better solution to each problem. It's just never perfect. Some people are telling me that I might become a generalist if I keep going like that- trying new software and techniques. But I will always think that doing that is giving me an edge over anyone who sticks to only one way, one software. It's just not good to be too satisfied with something when there's always a new way to do it better,faster, simpler.
Animation: Last time I did my animation in maya, I was really messy. Since then, I've managed to learn more about the graph editor, tweening and generally how to do it properly. I will try to put up another 3d viewer thingy for Eve in the next post
It's second semester now and I have a special assignment as part of one of my modules- Create a 30 second animation in flash... Sounds simple, right? Well,no! 30 seconds is not enough to create something meaningful for me. I had a lot of trouble coming up with a story that will last only 30 seconds and will put a smile to someone's face.
So the biggest issue was really fitting it in 30 seconds.
I felt like I have an advantage over the other students (well, some of them) .. I already have worked with flash on a professional level. I have worked on an animation show, called scoyo and another one- bio. So I know how the pipeline works- the steps in the production of animation. Nobody at uni told us (yet?) how does the pipeline work with 2d animation. Nobody told us how to do it, the storyboard, how to organise the fla files and take full advantage of the software. My guess is that they will in the following weeks. But I already have it all in my head. So, in case some fellow students from my course read this, I hope it will help them.
This is my production pipeline for 2d animation. Something that I learned from work experience.
Flash animation Pipeline
By Todor Imreorov
1.0 Storyboard
2.0 Character sheets
Make character variation sketches ---> make a character sheet
3.0 Animation in Flash
3.1. Set flash file
3.2. Import storyboard *.mov file and set the global timeline
3.3 Set the scene and create the character libraries

 I am a big believer in trial and error learning. So I challenged myself yet again, deciding to make a face rig that is simple, yet effective, no blendshapes. All the controls are on the face itself, since its easier to access them like that.
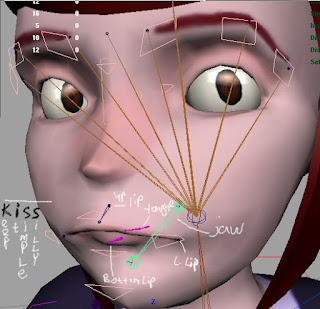
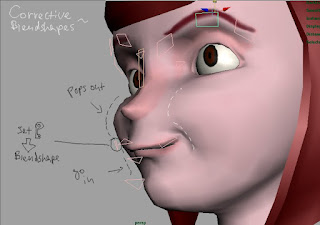
 Keep the inside of the mouth as a separate mesh, if you dont want to waste time getting the weights there right. One common problem when skinning is when the interior of the mouth comes through the surface of the skin. I really hate painting weights, so I didn't spend too much on that part. One of the most annoying parts for me personally is getting the weights on the fingers right.