nav2

Showing posts with label texturing. Show all posts

Tuesday, February 19, 2013

d4i- Low poly stuff and using vectors to texture again

There is really no point in doing sculpting and retopology when the characters are really really low poly.

There is quite a lot I could get away with topology-wise, given that the shader is  to be shadeless and wouldnt have any normal maps - the only thing that has to work is the silhouette and the deformations.
The game engine triangulates the mesh, so I am allowed to use as many tris as I want to.
in order to preserve verts.
Instead of making uniform meshes, I would split a mesh into shells - to save on faces.

It took a few hours to get them from scratch to UV unwrapped stage. A nice thing about the mirror modifier in Blender is that it folds all symetric UV islands that its mirroring automatically when you apply it - one half over the other whilst putting the left side islands on top of their right side counterparts. This is not good if your model will use normal maps (as noted in a previous post in this blog), but its incredibly useful when you want to save UV space for obvious reasons. If you unwrap(again) after applying the mirror modifier, blender unfolds them in completely symetrical islands that are normal map friendlier. It's still very easy to later flip one half over the other if need be.

The shells are all uniform and no stretching for as long as you mark the seams right. Doing this is Maya is a hassle (without $$plugins??). Autodesk, please be more competitive and improve your uv unwrapper. :P

For the UV seams, I like placing those where I know a different colour/material of the character will begin. For example the snail's shell and skin would be on sepparate islands. This makes texturing easier later. I like cutting seams on the side of the character where I know the camera won't be looking.

Priority was given to UV islands that are going to have transparent sprites (bee wings, hedgehog spikes).
Islands that are on areas nobody will ever see (the mouth interior of the hedgehog or the bottom of the snail) I scaled down as much as possible - gave them very little uv space.
On top of that I used the snapping options to overlap identical uv islands (the bee's knees, legs,etc).

Next step , I exported the UV layouts and got them in inkscape, to be vectorised.

This splits the island shapes that were bleeding into each other. From there its a matter of Path>difference. 

This then gave me a nice and easy base colour for each island (picked it straight from the concept art).

Using vectors allows me to export it to any resolution, while having it small. Just as I did with the concept art, I decided to keep all of the enemy textures in one file, so it's easy to track if they are consistent in style, polish and execution. I used masking, clipping and other tools. New feature in inkscape 4.9 called "select same" allows you to select all objects with same fill colour, line colour, style, etc automagically. Useful when used with "union" to merge shapes, saves loads of time when colouring.

The three models can share the same material and therefore UV space. In total they are 685 faces (as you can see in the pic). I might have to add a few extra edgeloops on the snail's neck, might take out some geometry...


Thursday, May 19, 2011

first try in CGFX - tracking and compositing

Been a while since I posted - and for a good reason! That however doesnt necessarily mean that I haven't been busy cooking new content. On the contrary :)
So This month I am going to try and catch up with you folks, also document my adventures with cg software.

Today I want to look back at an assignment that was presented to me by university. Let me start by posting the whole thing:


http://www.vimeo.com/23987995

No, my inspiration for this does not come from Jurasic park or Jumanji. I'd say mostly "Blade runner" and a game from the 90ies called "Flashback"

The footage that I got was grainy, and with a weird resolution (960x540) Pal (25 fps). The brief was to composit some elements over said footage by using after effects and tracking. The footage was only 11 seconds and I managed to get it ready in 11 days.

Here is how...


Motion tracking with matchmover turned out to be a semi-success , even though it wasnt very precise. Since the camera is not really moving in 3d space, just panning up- matchmover had a hard time determining where exactly are the markers in xyz. With some tweaking and even minor brute force I managed to at least get a coordinate system to use in maya.

Bringing the tracking data to maya revealed that there was a minor twitch of the camera. I fixed that by dropping two new keyframes over the group that contained the reference 3d objects and also deleting some keyframes. Some might say that this shot might have done without 3d tracking. The thing is that I really wanted to get to know the software+ there is some perspective distortion (on the roof of the building and the top of the entrance) as the camera pans up.

The first step for me was getting the trackers to work, in order to be able to pin things to the footage. Seeing if things would flow with the 2d and 3d tracking was also the right time to plan the shot. So After I got my 3d tracking done, I made a bunch of really basic non textured models and animated some of them. Later they were replaced by proper ones.


2d tracking with mocha
Just had to use mocha tracking, in order to pin some texture to the walls of the building. It turned out to be one intuitive and useful piece of software. Again- tutorials from youtube :P

I discovered that graininess and lack of focus on the background elelments make the tracking markers unstable. Thankfully that was something that could be fixed quickly in Mocha. It even has an "auto" button. Adjusting trackers with a mouse can be paintstaking , because one has to point at an exact pixel of the screen. One cool thing that I found out is that using the laptop's touchpad for this sorta thing is actually better than the mouse. By some lucky coincidence my mouse broke down at that time and forced me to do so.
Mocha was also excellent for rotoscoping (export shape data). Its capable of pinning the nodes of a mask to trackers, dynamically masking a specific area (used that for the top of the roof).


I pasted that tracking data onto a bunch of solids in aftereffects and then replaced them with testing uv grids. That is how I made a UV map of the faces of the building. Making its layer semi-transparent so it was possible to see both uv space and the building details underneath it.


After rendering that out of after effects and bringing it to photoshop, I laid it over the 960x540 original uv map image - using the free transform tool to unwrap it. Knowing where exactly the windows are enabled me to paint detail on the building walls. Its all hand painted in photoshop with the help of my cheap tablet.


The sky color mask was created with the help of the new amazing roto brush in after effects. I dropped a green tint on it, to make it look more surreal and to fit the mood of the shot I was aiming for.

Compositing the cgi footage:

In order to get my render to look right, I first made sure that I am happy with the colors in after effects and the building detail that I added has the right colors too. Then I rendered a single frame (Aftereffects) out of that and brought it as a frame in the tracking image sequence( that MAYA is using for the tracking camera ). I also opened it in photoshop, so I can pick the colors while painting textures on the cgi elements.
Uv work and texturing was all done in blender..

Scrubbing to the aftereffects touched frame in Maya, I was able to set up the light and materials as close as possible to blend in. A trick I did to make the cgi blend in more was using some reflectivity on the metalic materials and a sky dome mesh (which was set not to render, but to be visible in reflections). There is also a surface shader on the faces that I needed to key out in after effects. I separated the car in the sky from the landing car to two separate render layers- so it will be easy to quickly blur out the first in after effects- creating the illusion of depth of field and improving the composition of the shot.


Bringing the 3d footage to aftereffects revealed a number of issues that needed my attention. Some of it was covering the entrance of the building. I fixed that by getting some mocha shape data to aftereffects for the front of the entrance. I dropped some gaussian blur filthers, outline blur and hue/saturation on the elements. Some things needed to be desaturased. The cgi stuff was still too crisp so one last thing i did was dropping a slight Noise filther on it.

Things that can be improved:
The motion tracking data can be a lot better. Time restrains really left their mark and there are some minor issues that need attention. When the camera pans up, the top of the building shape twitches a bit, revealing a slight blue border around the bars of the roof top. The piston on the side of the landing zone is dropping a slightly unrealistic shadow which shouldnt normally be there considering that the light source is not close to it- its day light which should cast softer shadows.

All and all, this excercise was a really challenging and thus also fun one for me. I hope that I get another chance to do this sort of work again. Hopefully not with after effects! After effects makes it hard to find problems when problems occur. The layering way of approaching compositing is also a bit limiting. I had to toggle layers on and off to see where the problem is. That is in my oppinion a very inneficient way to deal with compositing, especially when there are more than ten layers in the shot. Nuke, Shake,autodesk composit (formerly Toxic) are all excellent packages to do cgi compositing with a proper node-based approach. The problem is that Universities (or at least mine) are not teaching it at the time that I'm writing this. :)

Tuesday, March 1, 2011

Blender vs Zbrush on normal maps

I've been juggling a number of projects lately. The animation on piggybank has been in the background and I haven't done much work on it since the last post. The models for the moCap project are ready now and this article will focus on the technical side of things as normal maps are concerned.

There is also a freelance job (a short 2d animation) that took some priority- I just want to make sure it ends up looking very good. :) I wont go into detail about it right now, as it wouldnt be professional to discuss it in early stages, while the client is very much deciding on how it progresses. I am not the type who would release anything I'm working on without the client's permission.

Anyway, onto normal maps.
It has been my main interest since the first day I started using a 3d package. How do I get a LOT of detail projected onto a low poly mesh. And whats with that obsession with low poly stuff (!?) some might ask. Am I just being a cheap bastard here , with today's technology advancing so quick. :D
Let me state the obvious advantages of keeping your mesh low on polycount- use geometry only where you need it.
- your computer can handle the files, especially if they are part of a giant scene.The files can be used in real time rendering engines. The playback speed while animating is near normal- no need to playblast it a billion times- its a waste of time.
- you can edit the files faster- its easier to edit the overall shape (especially with maya), its easier to paint weights (skinning) when you dont have to deal with a lot of geometry= that equals faster workflow
- You need geometry only to define the silhouette of a character and to define how the character deforms. The details can be achieved through bumpmaps and even better - normal maps. It makes me cry a little, every time I see a model that has been subdivided a million times, has geometry to define cloth wrinkles, face wrinkles,creases/cracks/etc, hair detail, etc etc. Why oh why dont you just make a normal map and bake all that stuff there?

Normal maps are just fancy bumpmaps. Some people convert bumpmaps to normal maps ( not much of a difference there lol). Some people convert textures to normal maps. Want to put some cracks on a rock? There is a photoshop plugin that should do it for you, you can also use xnormal. There is nothing wrong with that- it's just not good enough for something like a next-gen character. While bumpmaps contain information about depth, Normal maps go a step further. They contain information about direction of that depth. So one can have a really low poly character look very very detailed. The only thing that will give it away will be the silhouette of that character.
I know about displacement maps, but I wont go there now :D

So for next gen characters, one basically tells the software to compare the low poly mesh to the high poly mesh and create a normal map for the low poly mesh. Mudbox, zbrush, maya, blender- they all have tools to do that.

Since blender has a special multiresolution modifier for its sculpting mode, it is actually pretty damn good at detailing characters and baking a normal map. It might not be as good at handling giant meshes as zbrush, but its good enough to do the job.

I spent about a week in learning from trial and error about normal maps. For my little experiment, I used the two characters that I made for the moCap module. These guys are pretty much a work in progress and I am not even near pleased at where they are at the moment. Both of them have tangent space normal maps (tangent space is good for meshes that deform, but its a bit more expensive to render than world space, which is good for static objects)


Scarlet Thorn:

Scarlet was made almost entirely in zbrush. I made the hi res mesh (detailing) and exported a normal map from it in zbrush. The texture was also made in zbrush.Whats good about Z and I think is one of it's killer features (correct me if I'm wrong but mudbox doesnt have it) are the selection mask modes. Just with a click of a button, Z is capable of masking all the crease areas- that makes it extremely easy for the artist to flesh out detail..
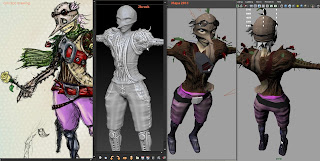

On the screenshot, you can compare how it looks like with detail in zbrush (actual looks) and then how maya portrays the normal map on the low poly object. I didnt show render, because rendering has million of options to tweak and that alone can make it look like anything.

Zbrush flips the map vertically by default. It also left me with some slight edge marks, which I had to clean with the smudge tool in Gimp. That was a bit annoying, but it still got me a decent normal map.


Sepia Baron:
I dont have to tell you how much more advance zbrush is at sculpting than blender. But the new blender has some key features that make it worth my time. First of all, its a modelling package that has sculpting capabilities. The brush engine in blender is actually kind of nice.I can do the whole pipeline in it- from modelling the low poly (check metaballs as a nice alternative to zspheres), retopology, uv mapping, detailing (sculpting). Blender can do it all :D. Maya is useless at sculpting- utterly useless... So I sculpted detail of my character in Blender- the newest build , then I baked it and got out a nice normal map.
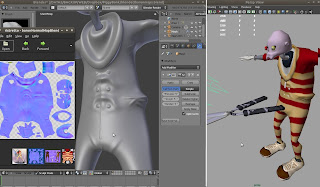


What was surprising about Blender's normal map was- it actually was cleaner than the one I got from zbrush. I know he's a simpler character, but I didnt get anything that needed my attention in gimp.
The only annoyance in blender is that when you subdivide the model, you can really feel the weight. It's probably a good idea to turn off skype while sculpting on subdiv 6. But that is likely to change, when the unlimited clay modifier gets released in some of the future builds. :D
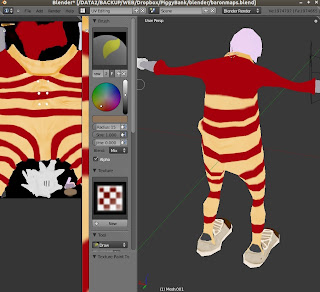

I used the normal map as a basis for the texture, since I wanted to bake some slight shading on the finer detail. The texturing was done completely in Blender+gimp. Its incredibly easy to use them at the same time- blender has a really nice integration with gimp, when it comes to image editing.


Normal maps and rendering engines~ This is pretty much where all the hedaches start for the artist. Different software handles normal maps differently. Maya has three ways of rendering it-
~hardware (viewport) render- seems to display the normal maps without any problems. Note that you should avoid having flipped uv islands- that always offsets the map slightly and creates really ugly seams. I got away with fipped island on the hands and feet, since I wanted to preserve some UV space... but that backfired on me. I needed to go back change the UV of Scarlet thorn in order to get rid of seams. Thankfully zbrush is capable of projecting detail from one mesh onto another (both texture and shape), so I didnt have to redo all that I had.
~Software (maya) render- is absolute rubbish at rendering normal maps. :D I might have missed something. I've tried my best, but not only do I get ugly seams everywhere possible, but its also not very good at representing the hi res detail.
~ Mental Ray render- Seems to be pretty good at normal maps. I got no seams, the hi res detail is pretty good. One thing to note is that it desaturates the textures. I dont know a lot about mental ray. Everything I've posted this far has been rendered with maya's native software render. I dont have the time to learn mental ray, so what I posted now at flickr is as default as it gets.

While still being on the subject of rendering and normal maps, it would be worth looking into how it works and why there are seams/hard edges in some cases. Blender developers have been hard at work on documenting that and improving the normal map baking magic that happens . It certainly has been a growing interest for me to follow its development and there have been some pretty exciting things happening there-keeping my attention.

Sunday, October 24, 2010

Summer ends and project Piggy bank


Well, I worked all summer. No, it wasnt for a studio or anything like it. So I couldnt get more good stuff to put in my portfolio. So there is a lot of catching up for me to do now.


My 2d and 3d animation (malfunction and Stoneage) were shown at a couple of festivals, one of which the Moscow festival of Contemporary Animation . Unfortunately their website is in flash, so in order to see my entry, you need to go to English>Participant2010> and I am under number 44


EDIT: Just received a honorary letter from the general Producer of the festival.


And while being at it, here is a screenshot of the finalists page of CG coach awards, where you will find me listed. I am putting it on a screenshot, just in case they take the website down.


Second year of university started and I've been busy doing all sorts of class assignments. Somehow inbetween the whole chaos, there is still time for me to have fun with new software.

Let me first start with whats my homework for this semester. A 30 second (tops!) 3d animated film featuring a girl lifting a heavy object. I already had two storyboards which I was eager to do, but then a certain someone decided that students should have less choice. So the tutor gave me a list of types of characters and things they can possibly do.
This was the one that:
a) everyone else was not doing
b) tolerable (one of them "auditioning for x factor" urgh and they expect me to do it without any voice/sound)

So I picked the girl scenario and quickly scribbled this storyboard literally a couple of hours before the deadline:
https://docs.google.com/fileview?id=0B4WmGlTeh8z8ZTJhOTg1N2ItYjBmMi00MzRlLTgyM2EtNWQ1ZmY3NGE2ZTE3
I still feel that the ending is weak. Maybe I can change it somehow.

And here is the concept art that I made:


Made with my favorite open source painting app- Mypaint

And then I modeled the girl with zbrush, fixed her topology on the hands and added detail in Maya. The retopology tool in zbrush 3 would create holes in the area of the hands. So the easiest approach there is to just do the tricky parts in Maya or blender.

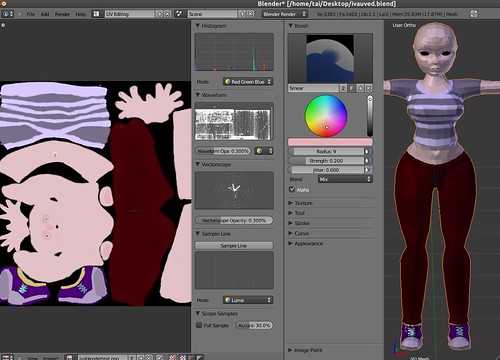
Next on is UV mapping and texturing. Since the character is with a cartoony design, I decided to avoid putting much realistic details. With 3d its very easy and tempting to make the model pointlessly detailed, but less can be more in this case. UV mapping and texturing was done in Blender 2.54 and took a couple of hours.

Blender-uvSeamsScreenshot

I decided to give the new Blender a try, because it has some tools that are better than Maya's at the moment. Uv unwrapping and sculpting mode are especially nice in blender. My hope to see a better sculpting mode in Maya is almost nonexistent since Autodesk also owns Mudbox and likes it when people keep buying it.:P So yeah, its also 0$. Of course it has some annoyances and quirks, but the more I use it the easier it gets. Texturing mode in blender lacks symetry, or at least I couldnt find it. Also pressure sensitivity for my tablet model didnt work, so I made the simplest most basic texture possible.

blender-polypainting

Her shape still needs some tuning. I will use belnder's sculpting mode to fix the hips/legs and head. I noticed that when I import it and soften the edge normals in Maya, her proportions look kind of different to the eye. That might need some adjusting too.

My goals with this animation are:
-learn Blender 2.5 and integrate it in the pipeline (70% done- I need to learn more)
-use maya dynamics - Maya hair or Maya cloth, but keep it very cheap on CPU/render time. Do that after the animation is complete.
Deadline is till the end of semester one. This new knowledge will help me create the next project- a storyboard that I've been working on for a while now.

Sunday, March 7, 2010

Mammoth mesh

Yesterday I created a mesh for the second character of my upcomming animation short for Bradford University. The mammoth is a low-poly mesh that consists of 820 quads, 4 textures and uv maps. I did the whole thing from scratch in 5 hours, using mainly Maya, but also Z-brush for the UV mapping and Photoshop for the texturing and transparency maps.


You can see a better quality render at my flickr gallery, which is previewed in a small window on the left side of this blog.

I found out how to embed 3d in flash content, so from now on, I will be able to post actual 3d viewers instead of static pictures :P

Monday, March 1, 2010

UV mapping and texturing of cave guy

Today I cleaned up the topology and finished the UV mapping and texturing work of cave guy. I used Z-brush to do the UV and Z-brush and photoshop to create and edit it's texture. There are no seams visible. I might have over saturated the skin tone. There'll be a couple of test renders later.


name of mesh: Cave dude
number of polygons: 3559
texture size: 1024x1024
Time taken: 3 days- one to sculpt,one to retopologise, and one to uv and texture...


Another thing I did was softening the Normals of the whole mesh and then hardening them on some of the edge loops.


It might not be a very good idea to uv it before it's boned, skinned and tested, but I just had to do it today.This was something I wanted to learn from ages. Now that I know how it's done, I think I will enjoy texturing organic stuff in the future.
I have to say though, I am relying too much on my tablet. If I didn't have a wacom tablet, this would have been very hard to achieve in 3 days.