nav2

Saturday, October 20, 2018

Adding a sound effects editor/generator to Gdevelop

I've been a fan of Gdevelop since before even knowing any programming languages. There is something wonderful about the design of the editor and especially the event sheet- which allows non-programmers to quickly create their own game prototypes.

Because of that, you can see now that ever since I acquired some programming experience, I have been contributing to it's editor at github. After doing some work to integrate Piskel - this allowed pixel art creation/authoring straight in the game editor. This is something I've wanted to have in it for a long time, but never imagined I would add to the editor myself.
In this last week I made another commit- that adds a sound effects editor to Gdevelop - straight inside the IDE. 
My goal with this is to make Gdevelop a stronger tool for rapid prototyping and game jam events - put it in the hands of artists in the team. Something as trivial as finding good basic sound effects and putting them inside your game might take 30 minutes or more - with this addition there will be no need to search for it, download,import and so on. You can even tweak the effects.

The library I initially chose was https://github.com/loov/jsfx. https://github.com/4ian/GDevelop/pull/695
After using it for a longer period and some further research and feedback, I decided to replace it with

Jfxr: https://github.com/ttencate/jfxr   https://github.com/4ian/GDevelop/pull/716

This is how it looks like now:
While being at it, I made the external editor embedding code more reusable and solid- something that should help for adding other editors to gdevelop in the future.

The idea for this came from remembering being on a gamejam- where we had 1 artist (me), one musician, one generalist and 2 programmers. My friend- the musician spent time on the music, but had to stop working on it on the second day- in order to look for basic sound effects. He lost some time also setting the software for making music (renoise). I thought- if we knew about this generator back then- it would have given him more time for the game music. A lot of games at that event didn't have good basic sound effects because they ran out of time, but those that did- the sound effects made a big difference on their play 'feeling'.

The event sheet in Gdevelop encourages artists without programming knowledge to try to make games, the pixelart and music editors should invite them to use Gdevelop even more. The IDE will give them a complete and very intuitive dev environment that is both effective and fun to use - like a fantasy console,but without limitations.

All of this of course would never be  possible without the incredible work done by Gdevelop, jsfx, jfxr and piskel's creators. My role in this was only in making them work seamlessly under one IDE- together and deliver a good user experience.

Friday, July 13, 2018

Porting Yarn to Electron and adding some cool features to it

Yarn is a tiny wonderful open source editor for non linear dialogue in games. It is written in html5 and exports the data in json file format- to be used with another library called 'Yarn spinner' in Untity3d games. Alternatively it can be used in html5 games with another dialogue file interpret library called 'bondage.js'. Yarn has had a stale development over the last two years- with a handful updates from it's community. More of the updates seem to have gone to yarn spinner. What attracted me initially to it is a kickstarter game that I backed a couple of years ago- called 'Night in the Woods'. Yarn and Yarn spinner were used to create it. Yarn itself is very sleek and user friendly- really clean interface, but it lacks some usability features that make it a little harder for new users to learn.
After looking at it's source code I decided that I want to try and incorporate it inside gdevelop - in the same way I embedded piskel earlier this year. It would really empower gdevelop 5's newIde for easy creation of story based games - rpg games, adventure games, visual novels- all that jazz. Gdevelop5 in that case would actually have an advantage over unity3d- as yarn itself and the library to parse yarn story files (bondage.js) can be integrated with the gdevelop5 and work out of the box in a very user friendly way.

In order for that to happen however, Yarn needs to be updated to use electron and get some usability improvements. This time I had to actually change the software I am embedding myself! Luckily it's source code was fairly easy to understand and nicely structured enough for me to dig in. It took me only a couple of hours to port it to electron. The main parts that needed porting were really file i/o and the way some libraries are used. The port to electron also fixed some old issues- such as the inability to have two instances of yarn open.

I really wanted the official yarn git to approve my port and make it the main development branch, so I submitted my port to them. The maintainer approved it but is for now keeping it a separate branch
and here is my Pull Request:

I also took the time to add a number of features that were requested before and I thought would really make it much more user friendly!

  • Ability to easily create links to other existing nodes via a new helper menu:(addressing #34)

  • Ability to test dialogue via e new "Run" menu (using bondage.js and with support to render bbcode)(addressing #29)

  • file drag and drop (including support for dropping multiple files)(addressing #32)

  • Automatically create New Nodes from [[new]] and [[new|choice]] - if no nodes exist for them (addressing #27)

  • Ability to run more than one instance of Yarn (addressing #59 )
  • Lots of fixes and new key bindings 
Since my pull request was approved, its electron port has seen fixes from a few other users- this makes me feel confident about the future of Yarn.
For that reason the next stage for me now is to look into integrating it into gdevelop 5. That begins with writing an extension for gdevelop that exposes the functionality on bondage.js to the event sheet. From there on putting yarn itself in gdevelop would be very easy. I already have that sorted for another personal project that is using electron.

In any case, if I succeed in getting these two to work as one and get it merged into gdevelop5, expect to see another post with a demo example game and a tutorial on how to use gdevelop to create non linear dialogue type interactions in your html5 games. :)

Wednesday, May 23, 2018

Getting two open source projects to work as one - Gdevelop + Piskel = Awesome!!!

In recent months I have been highly interested in javascript for a number of different reasons.
First of all my current day to day job requires a lot of repetitive data entry and data checking activity. I quickly found out that alot of it can easily be automated by writing different web crawler functions.

This is when I first started to reverse engineer websites in order to teach my macros how to extract information from them that it would then use to decide on how to proceed with it's data entry process. Web browsers are awesome in terms of their debuggers- in a way that many game engines arent. They let you dig through a web page, see how all elements are organized in it and how to programmatically instruct your web browser to click on buttons and fetch data. This is the definition of a web crawler.

This newly acquired experience motivated me to start digging more into javascript- as it is the scripting language of the web. Coming from a python background, going through web courses from scratch kind of felt like a boring route. So instead I went ahead and started playing with different game engines - such as Three.js and Phaser- both awesome engines btw.

Finally when I found out that Gdevelop's new IDE is written in javascript-  that made me excited- because for the first time I had an opportunity to change how it works.

To give you some background - before knowing any programming languages at all - I used to be 100% invested in engines like construct2 and clickteam fusion. But those two lacked something very near and dear to me- they weren't open source, thus not really owned by their  community of users. At that time I found Gdevelop- a great event sheet based programming engine that had almost everything I wanted. But its editor frustrated me when compared to  the other two- with a lot of small quirks and one big one - it wouldn't allow the user to author any pixel art. You would have to have pixel art prepared in advance to start prototyping anything. And prototyping is not as fun and personal imo if you are not moving your own stick man :)

This bugged me for years. Gdevelop being awesome, but not having a pixel editor like clickteam fusion and construct2. So fast forward to several years later - I suddenly have the real opportunity to change that! Gdevelop is open source, its editor is in javascript- which I have some experience with. There are multiple html5 based pixel editors that are also open source! Holly crap! Piskel is awesome - and its a perfect match. Can we do this? Can we?

Hell yeah we can! :P
https://github.com/4ian/GD/pull/493

Granted I am not as experienced as @4ian, the main developer of Gdevelop - he did do some refactoring on the code and helped me along the way. So did Piskel's author (the async function especially) - but what I made a pull request with was a fully functional prototype of the two applications working as one:

To do it I had to learn a bit on how both of them work!

So how does this implementation do it and why is javascript so awesome? Basically both Piskel and Gdevelop are html5 based apps. While Gdevelop was already running inside electron, I had to make piskel also run with it. That was simple enough- just create another electron window instance that will load and house piskel. In the process I learned a lot about electron's api - how to initiate, control and send signals between window instances. I had to tell gdevelop to send to piskel a list of paths where the image sequence pictures are.
Gdevelop is sending that signal to my own intermediate index file that contains the instructions of how the two should communicate. Inside it I had to load the image sequences from the paths and turn them into base64 strings. Didn't even know about base64 strings before this :)
Then finally parse that to the embedded electron window. And voala- loads them up!

But we have to keep track of the files- which frames come from gdevelop and which were made in Piskel? For that part I was just amazed at the fact that I could just attach new variables to piskel objects through my intermediate index file. Without touching piskel's source code I attached the imported image paths as a new variable to every frame object. I also hid piskel's  'New file' button and in it's place injected two new custom buttons. The main one - to save back to gdevelop overwrites any frames with original paths and create new paths for frames that were made inside piskel. When complete- it sends a list of paths back to gdevelop to load, where gdevelop reloads the list of sprites.

With all that done, Gdevelop now has pixel editing capabilities - which are actually more advanced than what you would find in construct2 and construct3 for example. Piskel has some very powerful pixel art tools!
Much thanks to both Florian Rival (Gdevelop developer) and  Julian Descottes (Piskel developer) For the patience and support along the way.

After  getting it merged, I also added:
https://github.com/4ian/GD/pull/522  and https://github.com/4ian/GD/pull/543


Piskel is now a part of Gdevelop!
If you want to play with it, please go ahead and grab a copy of the latest release:
https://github.com/4ian/GD/releases

It's free, fun and even if you aren't a programmer you can use it to create your own games and in the process learn a bit about programming  =)

Apart of  the addition of pixel editing, the newIde has an impressive number of new features almost every week and is being rapidly developed at the moment. You feedback and support will be appreciated!

Sunday, January 28, 2018

Metasnap - a screenshot+note+palette app written in AHK


This was a little pet project that took a couple of weeks to implement in my free time. I wrote it in the autohotkey scripting language with the goal of pushing its gui capabilities.

I needed some sort a screenshot app that remembers the area I want to take a snap of and lets me leave notes in the metadata of the actual image files. While developing it I realized that I can encode other types of data inside the image files, such as color codes - so the tool mutated into a color palette editor and basic note taker on top of a screenshot app.

Before it was called "Metasnap" - I named it snapgrab. In any case, if you have cool ideas of data that can be encoded into screenshots,please let me know:)

You can download a copy from bellow:

Features:
- Take screenshots of the entire screen or a set area. The tool remembers the area between sccreenshots
- Pick colors and store them inside the screenshots you took. Picked colors are stored as both rgb and html color codes that can be easily copied to clipboard. Ideal for web developers and artists. The color palette is stored as metadata inside the screenshot file
- Leave notes about screenshots you took - inside the screenshot files metadata
- Tiny image selector with support for bookmarks


Thursday, January 25, 2018

Godot 2.1 - 1$ gesture recognition plugin

Some time ago I encountered a little charming google doodle game that uses the player's scribbles for input:


You can play it here:
http://www.google.com/doodles/halloween-2016

That mechanic inspired me so much that I decided to try and implement it in Godot. Luckily I didnt have to start from scratch. The basic 1$ algorithm was ported to gdscript, but its bare bones implementation was not ready for gamedev. It was only a function that can be crashed. I added some commits to it. Fixed some game crashing bugs in common corner cases and added a bunch of cool features.

After porting it into a plugin, I added the ability to teach it new gestures and record them in a json file.
Added some extra optional features:
 The developer can set limited ink - to limit the size of shapes that can be drawn Upon recognizing a shape, it also emits a signal of what shape it is and how much ink was left when it was completed If the ink left is > 0, it will create a collision shape from the drawing, that can be used to interact with other parts of the game You can limit how many collision shapes can be drawn optionally.
Optional particle effect and ability to set line thickness and color Ability to set the allowed drawing area and change the mouse cursor to a pencil then it is over it

Here is a demo video:

It can recognize the following shapes out of the box (in the json file):
  • carret
  • v
  • pigtail
  • lineH
  • lineV
  • heart
  • circle
If you like the plugin, feel free to get a copy from itch.io (maybe even leave a tip in the jar ;) ):
https://blurymind.itch.io/1-gesture-recognition-addon-for-godot

Github page here:https://github.com/blurymind/1dollar_gesture_recogniser/tree/master/addons/1dollar

If there is enough interest in it, I will port it over to Godot 3..
Might make a little game with it when I get the time :)

Wednesday, January 24, 2018

AHK scripting

It's been a while since the last post here and a lot has happened. It might take more than a few posts, but I will try to catch up. My current job has taken a way a big chunk of the time that used to be dedicated to creative tasks, however it allowed me to advance my programming skills and do some interesting things.

I noted in a previous post about what it entails- a lot data validation and entry. The company has allowed me to automate the majority of the processes via scripting. For that I chose Autohotkey- as it's the perfect windows api for macros and its open source.The AHK scripting language looks like Basic mixed with javascript and can be a pain in the neck in the start- but it's pretty cool once you get a hang on it.
Using it, I wrote a gui macro app that does my job's process automatically. Under the custom interface, the app holds a giant collection of macro scripts, web crawlers, logging and automatic data correction functions.
I called it "Sunlotion" - the name is a joke- for it fills in for all the flaws of the scheduling software that the company has been using- we shall call that "Soul Destroyer" in this article.

When I get a job request in an email or a spreadsheet, all I need to do is highlight the text and pop up Sunlotion's custom menu - it gives me the option to parse the text. Via a combination of regular expressions and functions, Sunlotion populates it's own interface's fields with the correct information from the text I fed to it. Who requested the job, who it's for, duration, date, project code, etc, etc

The date gets checked- is it on a weekend, is the date too soon (short notice jobs) , is it this year (believe it or not people make that mistake too) and so on. It gets converted to the correct format automatically- "fri 12 jan"  becomes 12/01/2018 - so as not to trip Soul Destroyer.
The duration also gets converted to the right format automatically- "2 days" becomes "15" hours. 1.5 hours becomes 1.30 hours. Project codes get automagicaly validated via a web crawler macro - when it receives it, Sunlotion  navigates to a website in the background, checks the status of the project code and if valid- proceeds. If not- it creates a reply email about the status of the code and sends it to the requester.
Another crawler macro checks what area the job is for (so it knows whom to email later) by navigating to another website and extracting the data.It detects if its fed a site code or a site name. If its a site name, the web crawler macro will retrieve the site code.

And after all the raw data is automatically organized, cleaned up, analyzed and validated by Sunlotion, I click on a button and it fires a macro that raises the job on Soul Destroyer, writes the email, attaches the right files, the right send to emails, logs the job to a spreadsheet and moves on to the next job. Rinse and repeat.
For some types of job forms I was able to completely automate the process , so my tool would raise a sequence of hundreds of jobs on Soul Destroyer without need of any supervision.

These are just scratching the surface though- there are so many macros, crawlers and functions, that it would take too long to list all.

Of course my managers noticed that this was freeing my time and gave me other tasks to keep busy. I started raising jobs that another department had to raise in the past. I wrote little apps for my department and other departments to save the company time by automating other processes(over 10 apps so far). The company in return gave me a yearly bonus and an innovation award.

There is no raise in sight, I am not technically getting a programmer's wage either, but the experience has helped me tremendously in becoming better at writing my own apps.
Since I can't show or share Sunlotion here because it was written in company time- I made another AHK app in my personal time for fun. It's called Metasnap.
You can check it out here:
 https://blurymind.itch.io/meta-snap

I might write a post about in later on.

I have also been working on another app- that I am writing in Gdscript via Godot. Stay tuned- it will be more interesting to present :)


Sunday, August 28, 2016

Job applications - happy villager

I had a call from an agency a couple of months ago. They forwarded my portfolio to a studio in London. The studio was looking for an animator/rigger with experience in Unity3d and mobile games. My previous experience was close to what they were looking for and that got me to the interview stage. They interviewed me via Skype and explained that the final stage would be a test for which I have 4 hours to complete and send.
The test was on the following week. When I got the project file the clock started ticking. I didn't know what to expect prior to getting it. What I got was just body parts in black and white , and a reference image (on the right). The goal was to rig the character and animate a happy emotion that is up to 4 seconds long.
Rigging the character took about an hour. I arranged some elements into their own subfolders. The hierarchy of elements was key to getting the animation polished quicker. For example I put all face controls under a facedir node - that would allow me to turn her head with less keyframes to manage.
The minimalist character design was a good thing in this case - even with the imposed limitations -such as for example the lack of joints in the legs. I worked with what I had.

All and all they never did give me a call. Instead the agency told me that I have passed their test and they really liked my work. However the CEO has decided to hire somebody that they already know from previous projects instead.

Normally I wouldn't share work done for others, but given how I did not get paid in this case, how they didn't give me personal feedback and also that there was no NDA signed, I feel absolutely free to share this here :)

The animation has a drop in frames, because it is captured from Unity with capture software. When running, it is as smooth as butter 60fps. Thus why all I could get out of the whole experience is now the gif file you see above and the unity project.

If you are looking for an animator with rigging experience - who can do the rigging and the entire animation in Unity alone - I can send you this test file to review it yourself.


Monday, August 8, 2016

Using macros and a clipboard manager to automate data entry tasks

I recently starter work at Arqiva. My job involves a lot of manual data entry.
The software they have for that at the moment is really bad at repetitive tasks - which are common in this job.

It forces the user to click through drop down menus, input boxes and pop up dialogs in order to enter the data of a single job that needs raising.  You can't alter the data of multiple jobs at once. The entry boxes have missing mouse scrolling, basic text formatting and even a right click menu. It makes the software look as if it was made in the middle of the 90ies.

Example of such a task is raising a request for an engineer on the system - where I need to file over a 100 job requests for different sites that have the same description and other types of data such as date (hello pop up calendar), type (drop down list menu), codes (hello input boxes),all sepparated by a wonderfully annoying requirement to click on a 'next' button. It's very old school, lacks any design common sense. I am not sure if the guy who made it actually tried using it xD. Anyways...

All the people before me laboriously filled the same boxes a 100 times with the same information - for different job sites. Each job took over 30 repetitive steps by the data entry clerk. So 30 steps multiplied by 100 sites = 3000 steps to raise the 100 jobs.

After doing this for a day - even with some copy and pasting from a notepad, I found it to be error prone, laborious, boring and slow. After repeating the process 50 times, one can forget to paste something or click something wrong.

I had to do something as this started to drive me nuts. I came up with a simple macros + clipboard manager solution.

Since tech support wouldn't let me install any software without waiting for months, I decided to use an open source portable version of whatever I could find. I didn't have much time to look into all the options out there - but what I found did fit the bill!

tiny Task - for recording and playing a macro:
http://www.vtaskstudio.com/support.php
It automatically selects menus, clicks on buttons and enters text for me.

When you combine it with a clipboard manager - it becomes a very powerful automation tool!
One such nice manager is Clipx:
http://bluemars.org/clipx/

ClipX stores multiple slots of information that can be recalled to be pasted when required - via an appointed keyboard shortcut and selection.

They are both tiny, need not be installed or administrator privileges, and are free/open source.

Thanks to these two, I have successfully created myself a nice little data entry AI that does 85% of all the work for me. It has 95% success rate when set right.

Its not like I just browse facebook as it is doing all the work - I still overlook the operation for any errors - those 5% are important! I also do need to fill in the manual parts of the forms that do not repeat - if such are present.

The end result is an over 30 step process being reduced to two clicks.
So a 100 jobs would take 200 steps, rather than 3000!
Huge improvement if you ask me. And instead of going crazy clicking, now I get to calmly drink my cup of tea while the whole thing is done by the AI.

Wednesday, May 18, 2016

Texturing PBR materials in 3D Coat and exporting to Unreal 4

3D coat generated an ambient occlusion and a curvature map for each object I painted in it - that way it knew how to paint in crevices that are stored in the imported normal map.
It was excellent in this regard as I found out that it can handle memory quite well when compared to Substance Painter. In 3d Coat I was able to get over 40+ layers on 2x2048 maps of 3 paint objects - with all channels + normal map. In substance painter - it just crashed on the second or third layer I made (preview texture set to a miserable 512).Even though my laptop is 7 years old - 3d coat handled this one quite gracefully.

For the skin I used one of the leather pbr shaders that came with 3dc and heavily altered it to make it look more like human skin.
Of course it is really difficult to fake SSS in real time. Unreal engine - which is the target engine for this character does have a SSS shader, but since the character will not get any closeups and not much of the skin is really revealed- I decided to be cheap again and stick with one material for the entire character. Before texturing the body I made an import test of the head/spray mask texture.

I set the texture maps in unreal in a way where the alpha channel of the diffuse is used to store the roughness map pass. I also wanted to use tha alpha channel of the normal map to store the metalic pass, but I found out that Unreal 4.10 does not allow using the alpha channel of a normal map texture if the file is a png. A few forums noted that it will work if I use targa instead - but targa is a huge file size and I thought i wont be saving a lot that way.


I imported my character with the unreal rig applied to it.
Here is the model - you should be able to preview it in your browser:


For the spray cans in the game I used an rgb map to split it into three areas - cap, sticker and can . The alpha channel of the sticker controls the sticker's mask in this case. That way the programmer on the project - Steve Stavrev can control the color of each instance of the spray and even change it dynamically during run time to create some interesting effect. 
His pose and animation is not my work - it is using one of the unreal project examples. Since my binding pose and the source binding pose are slightly different, the actual animation is a bit screwed up on the target. Unreal 4 supposedly has nice tools to adjust binding poses and when this issue is at hand, but I discovered that as I am writing this (4.10.4) there has been a bug for over an entire year that nobody from epic fixed that stops the users from doing that. I had to blindly set up the bones in blender, but the fingers are still screwed.
The best thing to do here for my portfolio is to actually make the animations myself, but unfortunately the freelance nature of the project dictates that we make do with this.

Sunday, May 15, 2016

Some notes on baking Normal maps again

Flipping UV islands is a common way of getting more pixels to cram in detail. What you do is for each symmetrical part of your model, you take the left side and flip it over the right side.

 That doesnt mean that the entire left side should be the same as the right - if you do that your model will of course be a bit bland. So plan in advance which parts you want to have symmetric and which not. You should plan it right from when you start making your high poly model.
In my case, I sculpted the nude in Zbrush completely from scratch, but used marvelous designer to create his outfit:

Making the hoodie was a  gotcha moment.I had to first stitch it in neutral pose over his head and run the simulation to get it to wrap around it naturally, then I puled it down to fall over his jacket during another cloth simulation. He looked good with a hoodie on, but the final design was planned  with a hat on instead.
Marvelous provided some really nice realistic cloth simulation which resulted in a good starting point for wrinkles and detail. Bringing the clothing back to Zbrush - I added detail to it - more wrinkles and a zipper here and there, the shoes and shoe laces. The hat, the hands and the respirator mask are all made in blender - where modelling them made much more sense. For the mask I used modifiers heavily. Wireframe modifier was perfect  for the cage.

Naturally the generated cloth mesh had no symmetry. So then when I started doing retopology in blender - the plan started forming more. For the outfit I will keep the middle part asymmetric, but will reuse the texture space of the sleeves. Same goes for the pants. His face will be completely unwrapped, but I will reuse uv texture space of the neck, the the cap shade and the shoes.


So I did the model accordingly in two stages- first retopo the asymmetric bits, then do the ones that reuse texture space - with a mirror modifier. I had to cut the hi poly model import from zbrush and marvelous designer into body parts and make the planned ones symmetrized for the high poly mesh - where there was no symmetry for the clothing. Thankfully blender has wonderful sculpting and modelling tools that make that part a walk in the park.

 When baking a normal for a target model with flipped islands that overlap their counterparts, you are most probably going to get seams.
If you want to avoid it, but still be able to reuse texture space via flipped uv islands, it is important to do this: Select all islands that overlap other islands, and move them in X + texture.width.


As a side note you need to consider that this UV technique does not work if you need to bake a lightmap on the model - which is usually the case for static background objects.

For the mask normal baking, I arranged the uv islands in a way that it will bake the bars perfectly horizontally and vertically. It is generally a good practice to arrange your islands in a way where you will get less diagonal lines on the bake - try to avoid diagonal straight lines as a whole. Horizontal and Vertical lines have  no anti-aliasing you see - so geometric detail such as this looks much crisper on lower texture sizes. If you look at model rips from old video games - you will see that they utilized this approach quite successfully to get some good looking textures as small as 256 or even less. I was also being cheap again with reusing UV space  with a vertical mirror. Whenever you can, and especially for detailed parts with repeating elements - try to reuse texture space!

In most cases, you will still need to clean up the bake result.
The normal cleanup was done in Krita, as 3D-Coat does not allow cleaning up external normal maps. Their import layer is locked and limited to very few operations.
 It was however quite good at further detailing them during texturing with your PBR materials. Next post will be about that =)

Friday, May 13, 2016

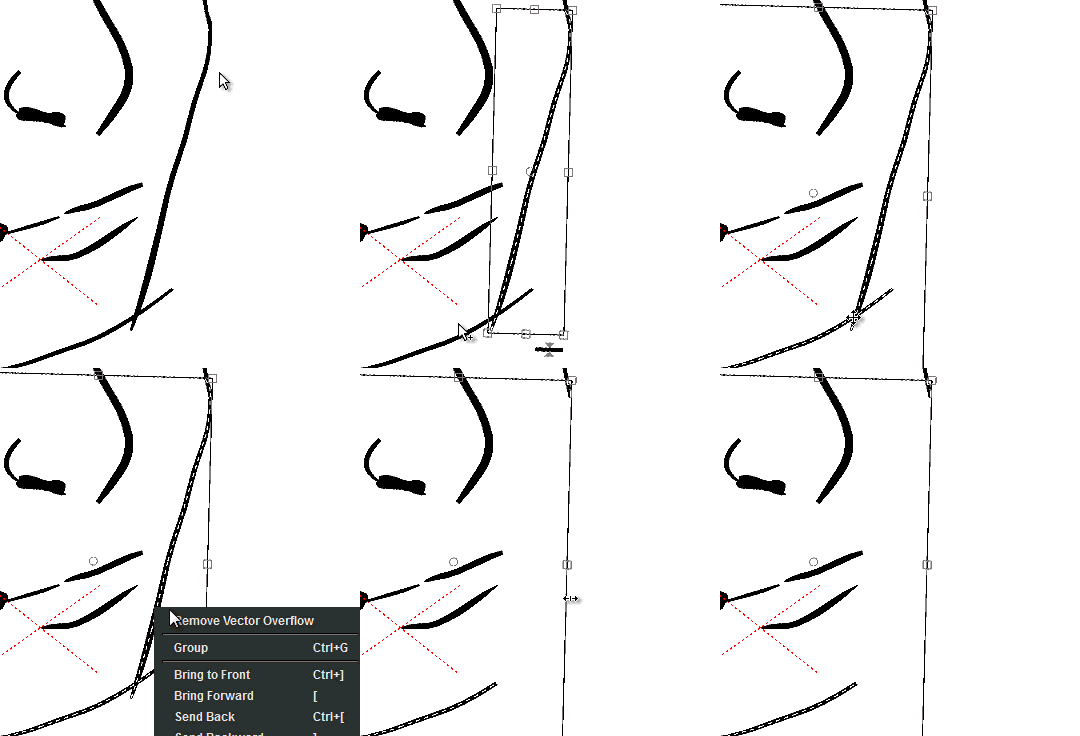
Feature proposal - vector eraser that erases strokes up to intersections


Very often when cleaning an ink drawing, the artist will need to clean up line overshoots. A good example of this is hair, but it applies to many places in a drawing.
In vector software, we tend to favor line overshoots, because that way we know for sure that our shapes will be closed off and ready for the bucket tool.
The first time I see this idea applied in an open source project is in  OpenToonz - the 'Remove Vector Overflow' command. This is where this command is supposed to come in and save the day.

It however hardly works. Very often it does noting at all.In fact almost 80% of the time when you select two overshooting individual lines, nothing happens, or it erases parts of the lines you want to keep.
My suggestion here is to add two new modes to the eraser tool - when you are using it on a vector level. These two modes can already be found in other software such as toonboom, clip paint studio and last but not least - inkscape:

A. Erase up to intersection - This can be found in both Toonboom and clip paint studio. What it does is it erases the lines up to the intersection point - where they intersect with another line. Clip paint studio has it as an eraser tool mode and it works excellently.
Toonboom has two strategies to deal with this. One is the one clip paint uses. But as a second strategy - there is an option in the brush tool - to always create a new node where the stroke you drew overlapped another stroke. From there on it is easy to erase all the nodes exactly to that point and you dont need to move nodes around to get them to overlap. Another strategy with the brush tool is to automatically snap the beginning and end of a line to a closeby node of another line or the line itself (toonboom). Inkscape allows you to continue previously drawn lines - but unfortunately works at the end points of lines and is very limited.

B. Object mode eraser- very often the artist would require to erase entire strokes of a drawing - every stroke is a vector object. Right now in OT you have to go to the select tool, select the strokes and hit delete, then go back to the eraser tool to continue working. In inkscape the eraser tool can also erase entire strokes like this:
The implementation in OT almost never works in practice. It works when you draw a simple square, but when you draw a character and start trying it out - the one in clip paint does the job , while vector overflow in open toonz fails
I wonder how clip paint does it. It's the best one I've seen so far. Strokes there dont create nodes at intersections - so they must be somehow figuring out where the intersecting points are:
Here is my theory
--when the stylus starts a stroke in vector eraser mode:
1. Vector erase stroke collects a list of lines (like inkscape does in example B.) that you touched during the stroke.
--On release the following happens:
2. Instead of deleting the entire lines (which is an option also), it splits them all up at intersections points (cache result)
3. Using the result from step 2 , It marks the parts of the lines that your stroke has touched and deletes them
4. The lines that were split up (in step 2) are connected again
5. All the lines in the list of lines from step one are deleted and in their place are created the lines created by this operation.
To the user it looks like lines were deleted up to the intersection - just like it happens in the gif of example A .
Anyways, if i knew c++ i would have tried to figure out a way to make this. Hopefully a more experienced programmer will be interested.
So in order to implement a vector eraser mode that deletes lines up to intersections, you will first need to implement a mode in which it can collect a list of all the lines that it has touched.
You get two awesome vector erase modes in one!

Inkscape developers are much closer at achieving this tool, as they posses the main elements.
The default eraser tool mode already collects a list of lines that the stroke has touched.
The 'Cut Path' command can split a line where another overlapped it, it however deletes the line that overlapped it - which is something we do not want in this case!

Krita Developers - Are actually currently trying to collect funding via kickstarter to improve the vector tools in it. There is no statement made in the campaign that they are planning on adding such a mode to the vector eraser. It is not a stretch goal either. But in any case, I found out that some of them are quite aware of this tool in Clip Paint Studio. Whether we see it in Krita or not - only time will tell. It currently needs an entire rewrite of the vector system, but for that to happen they need your help:

If you haven't seen krita yet, feel free to give it a try. Downloads to the latest version are available at the kickstarter campaign page.

OpenToonz - The development of opentoonz is active as I write this, we will see if in the future they improve this feature. In any case, I filed it here #287 in their bug tracker.

Friday, May 6, 2016

Opentoonz adventures - mini review

When I heard that the software that ghibli uses is going to be open sourced, I became so hyped about it that I went through all the features that it will bring before even getting the open source version.

I kept stalking internet for more information, kept waiting for the day Dwango will release it on github - looking at what time it is in japan and for footage or livestream of the conference.

Opentoonz did get a release and it was a bumpy one.
On the day it came out, everyone thought that the developer is just dumping the code for someone else to maintain.
Compared to the latest version of toonz harlequin, open toonz turned out to be quite unstable, full of bugs and missing features.
The features were apparently removed by ghibli developers who thought that they get in the way of traditional animators.
Naturally all the features missing were the ones that paperless/cut out/2d rig animators cant do their jobs without. :D

I fell in love with the thing, but became disapointed at first in the same time.
I wanted it to get better, so every bug found -I reported at the bug tracker. Almost 30 reports there as I write this are mine:
https://github.com/opentoonz/opentoonz/issues/created_by/blurymind

I had a couple of false ones - which I closed myself. almost all of them - regressions created by alterations made to toonz harlequin.

And in the end - only one minor bug that both harlequin and opentoonz share:


The japanese developer (mainly Shun Iwasawa) has fixed a lot of them and brought back most of the removed ones. He seems to be the most active contributor and has patiently explained the reasoning for the changes in the software here:
https://github.com/opentoonz/opentoonz/issues/108


But there are still a couple of very serious ones.
Namely, it is no longer possible to edit sub x-sheets in place.The curves editor's interface has been made a pain in the ass to use.

The default layouts are broken - toolbar missing, nonsensical room layouts hiding vital editors - if you are a paperless animator. So If you do give OT a try, make sure to download these premade layout files I made:
https://github.com/opentoonz/opentoonz/issues/80
You might still need to add some menus back.

Development hasnt been active for a while now. I hope that devs are taking a vacation and not just abandoning it.  I really like the tool, I think it has a long way to go to be on par with toonboom - but it is already the most advanced open source traditional animation package out there.

It puts both krita and synfig in the dust. Not to mention pencil2d.

I might continue my review of the tools once they get on par with harlequin. My biggest hope is that OT continues to grow and even become something more than harlequin. Right now it is still something less. But things are changing.


Wednesday, March 16, 2016

multimedia fusion - code - load CSV file system


I made a system for Fusion to parse CSV files. This was a while ago, just forgot to post about it here as well.

This type of file is pretty much an excel spreadsheet. It is very useful for visually editing a 2d array, where you can store all of your game's dialogue, inventory, stats, etc. With this system the game can load this file when it starts and use the values from it. A big advantage of that is that people editing the file dont have to know how to use the engine or have the source code of the game. That way you can have a community of users easily be able to translate your game or mod it's stats externally. Here is from the click store:

Load CSV system - for loading and using CSV files in multimedia fusion games.

CSV files are simple spreadsheet files that can be edited in libre office or google docs (both free). They are great for rpg/story based games because of their convenience as a data base storage.
-Multiplatform - works with all exporters.
-Easy to use in other projects - takes seconds to set up.
-To get a cell's contents, you call it via the Column and Row names - you have given to your table. Plain english language words (Column=monster, Row=health --> monster health = 50). This opens the opportunity for some cool scripting that would be difficult to achieve with an array.

-CSV files can be easily opened and edited externally. That means that you dont need to rebuild your game to tweak values that it is using in a CSV files. You can set up a simple spreadsheet in google docs where all of your game's dialogue is and allow for others to collaborate/localize it without having to share the entire game project or ask them to install the engine.You can buy it from here:
http://clickstore.clickteam.com/open-source?product_id=300
:)

Construct2 and Fusion 2.5 review, Learning Python and applying it to Gdscript (Godot)

I recently started learning Python. A lot of people say that it is a good first language to learn. The truth is that in the past I have used visual programming tools such as Clickteam Fusion and Construct 2. You still do programming in them - you execute functions, deal with gotchas that come from programming, write expressions and learn some syntax. But they aid you along the way - offering an easily accessible list of conditions and actions you can use. Behaviours and types of objects you can attach - each brining ready functions to use in your game. All paired with a nice level editor.

But having used them for a while, I quickly found out the disadvantages:

Fusion - It's a really nice application. Having used it for years now and even halfway created a stealth game in it - I like their engine. I am even selling some stuff at their store.The biggest disadvantage of using it is truly how bad it is at code reusal and instancing. It is so bad that people serious about making a game in it write their own level editor for the thing.
Functions in it are called 'fastloops' and you can not pass any arguments or return a value. You can not nest conditions in any way. You do a lot of copy and paste of conditions and actions. It is designed from the ground up to be good at copy and pasting, but not good at any instancing.
The level editor can not give unique values to different instances of an active object. You can do it via code during runtime, but not in the level editor. As a result you do a lot of copy and paste of an object in order to create variations of it. when you change the logic of one copy, it only changes in that one copy. This gets even worse when you consider using it on different levels - called 'frames' in fusion. All of your logic is attached to rooms. If you change a piece of logic in one room, the same piece will not change in all the other rooms. So imagine coding your game's inventory and hud. Later on you find a bug, and you fix it in one frame, then manually copy and pasting the logic too all the 150 other frames.
Fusion has a global event sheet , but the issue with it is that it can not use any 'qualifiers' (the way they call tags). This as a result locks you out of the opportunity to use a piece of logic globally on objects with the same tag. So it doesnt solve the problem with instances of an enemy not having the ability to vary in variables.
Fusion's editor has some bizarre hardcoded logic into it. You can not create your own qualifiers, just use the ones that come with the engine. The animation editor does not let you erase,reorder or rename the first 5-6 animation clips. Some clips are hardcodedly marked to have one properties, others have a different set of properties.
Exporters are fusion's biggest weakness at the moment - this is where people who write plugins for the engine must rewrite their plugin for each exporter. As a result a lot of features are supported under one platform and not available on the other platforms. A thing as simple as loading a json file and parsing it is not available as a built in feature.

To give them some credit - at least you can compile native code to different platforms - if you have bought the (expensive - hidden cost) exporters.

Construct2 - Scirra's tool is like a successor of fusion in terms of vis programming and it solves all the problems of code reusal. All of them. As a result it's community is much bigger and there are a lot more addons and features created by the community. The one big advantage of C2 is really also it's strength focused development. It compiles only to html5. That lets you port your game to all mobile and desktop platforms for free - you don't have to buy any expensive exporters. However that comes at a development cost - your game is basically loaded in a stripped down web browser - that adds about 100mb to it's download size and also there is some noticeable performance cost - especially on older mobile devices.

Then Godot caught my eye and I immediately fell in love with it.It excels at code reusal, comes with a huge amount of very useful functions. It compiles native code to all mobile and desktop platforms. Unlike the above two - it is both free and can be used to also create 3D games! The biggest advantage however I found out to be the open source nature and the community that has formed around it. Godot's community is wonderful, vibrant and very responsive. You have an issue? Post it on their fb group and in 5 minutes someone helps you out. If it's missing and it makes sense to have it - someone implements it the next day or puts it on the roadmap.

The engine has wonderful design, but it comes at some cost. You have to actually sit down and this time learn programming for real! No clicky visual stuff.
So I did and found out that gdscript is very similar to python. it can't have two iterators in FOR loops among other things, and some of the syntax and method names are different, but otherwise it's almost python.
Added that Blender, Inkscape and some of the other tools (Maya) that I love are written or use python for custom addons - it was an obvious choice for me to learn it. And someone from the Godot community had the perfect timing to point me to the Coursera courses!

so far I completed 2 of the 4 courses. I found them to be very good and they did enable me to do much more advance stuff with Godot and not have to ask stupid questions. The first course teaches about programming flow. The different types of loops, variable scopes, order of command execution, functions for code reusal and so on.

 The second course teaches about data structures in Python. How to load data from a text file and scan through it. Cut it, change it, load it into different structures (dictionary,lists,tuples) and use it to classify it's contents. This course is very key if you need to write an application (and most do) that saves data to the user's hard disk. When they save their game for example. This is where flow becomes a key to processing that information. 

Saturday, March 12, 2016

Some of the projects I worked on at Disney Interactive

Back in 2011 I had the wonderful opportunity to work at Disney Interactive Studios as a Production Intern for an entire year. During that time I was involved in the production process of a number of Disney and Marvel IP games developed by the Disney company in conjunction with other game studios.

Recently I learned that "Vanguard Creative" has released a few screenshots/information of some of those projects:

Disney Universe: 


More about the project here:

http://www.vanguardcreative.uk/project-du.html
▷ Art Direction, Concept, Creative Design, FMV Scripting, Logo Design, Marketing & PR assets


---------


Invincible Iron Man

Become Iron Man in a superhero action game with super destructive combat, freestyle flight, a reinvented morphing armour and a supercharged story with life or death choices.

More about the project here: http://www.vanguardcreative.uk/project-im.html

▷ Art Direction, Creative Design


Secret Wars

Marvel's biggest heroes and baddest villains battle each other in a vicious Secret War, stoked by The Beyonder.

More about the project here: http://www.vanguardcreative.uk/project-sw.html

▷ Art Direction

Q-botics

A virtual construction kit with physics simulation enabling you to construct machines, complete challenges and share your creations online.

More about the project here: http://www.vanguardcreative.uk/project-qb.html

▷ Art Direction, Avatar Development, Narrative, Web Portal Design


Keep an eye on Vanguard Creative. They have some very cool new projects cooking right now! :)