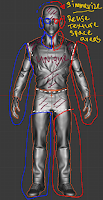
 Flipping UV islands is a common way of getting more pixels to cram in detail.
What you do is for each symmetrical part of your model, you take the left side and flip it over the right side.
Flipping UV islands is a common way of getting more pixels to cram in detail.
What you do is for each symmetrical part of your model, you take the left side and flip it over the right side.That doesnt mean that the entire left side should be the same as the right - if you do that your model will of course be a bit bland. So plan in advance which parts you want to have symmetric and which not. You should plan it right from when you start making your high poly model.
In my case, I sculpted the nude in Zbrush completely from scratch, but used marvelous designer to create his outfit:
Making the hoodie was a gotcha moment.I had to first stitch it in neutral pose over his head and run the simulation to get it to wrap around it naturally, then I puled it down to fall over his jacket during another cloth simulation. He looked good with a hoodie on, but the final design was planned with a hat on instead.
 Marvelous provided some really nice realistic cloth simulation which resulted in a good starting point for wrinkles and detail. Bringing the clothing back to Zbrush - I added detail to it - more wrinkles and a zipper here and there, the shoes and shoe laces. The hat, the hands and the respirator mask are all made in blender - where modelling them made much more sense. For the mask I used modifiers heavily. Wireframe modifier was perfect for the cage.
 Naturally the generated cloth mesh had no symmetry. So then when I started doing retopology in blender - the plan started forming more.
For the outfit I will keep the middle part asymmetric, but will reuse the texture space of the sleeves. Same goes for the pants.
His face will be completely unwrapped, but I will reuse uv texture space of the neck, the the cap shade and the shoes.
Naturally the generated cloth mesh had no symmetry. So then when I started doing retopology in blender - the plan started forming more.
For the outfit I will keep the middle part asymmetric, but will reuse the texture space of the sleeves. Same goes for the pants.
His face will be completely unwrapped, but I will reuse uv texture space of the neck, the the cap shade and the shoes.So I did the model accordingly in two stages- first retopo the asymmetric bits, then do the ones that reuse texture space - with a mirror modifier. I had to cut the hi poly model import from zbrush and marvelous designer into body parts and make the planned ones symmetrized for the high poly mesh - where there was no symmetry for the clothing. Thankfully blender has wonderful sculpting and modelling tools that make that part a walk in the park.
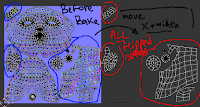
 When baking a normal for a target model with flipped islands that overlap their counterparts, you are most probably going to get seams.
If you want to avoid it, but still be able to reuse texture space via flipped uv islands, it is important to do this: Select all islands that overlap other islands, and move them in X + texture.width.

As a side note you need to consider that this UV technique does not work if you need to bake a lightmap on the model - which is usually the case for static background objects.
For the mask normal baking, I arranged the uv islands in a way that it will bake the bars perfectly horizontally and vertically. It is generally a good practice to arrange your islands in a way where you will get less diagonal lines on the bake - try to avoid diagonal straight lines as a whole. Horizontal and Vertical lines have no anti-aliasing you see - so geometric detail such as this looks much crisper on lower texture sizes. If you look at model rips from old video games - you will see that they utilized this approach quite successfully to get some good looking textures as small as 256 or even less. I was also being cheap again with reusing UV space with a vertical mirror. Whenever you can, and especially for detailed parts with repeating elements - try to reuse texture space!
In most cases, you will still need to clean up the bake result.
The normal cleanup was done in Krita, as 3D-Coat does not allow cleaning up external normal maps. Their import layer is locked and limited to very few operations.
It was however quite good at further detailing them during texturing with your PBR materials. Next post will be about that =)

No comments:
Post a Comment