Very often when cleaning an ink drawing, the artist will need to clean up line overshoots. A good example of this is hair, but it applies to many places in a drawing.
In vector software, we tend to favor line overshoots, because that way we know for sure that our shapes will be closed off and ready for the bucket tool.
The first time I see this idea applied in an open source project is in OpenToonz - the 'Remove Vector Overflow' command. This is where this command is supposed to come in and save the day.
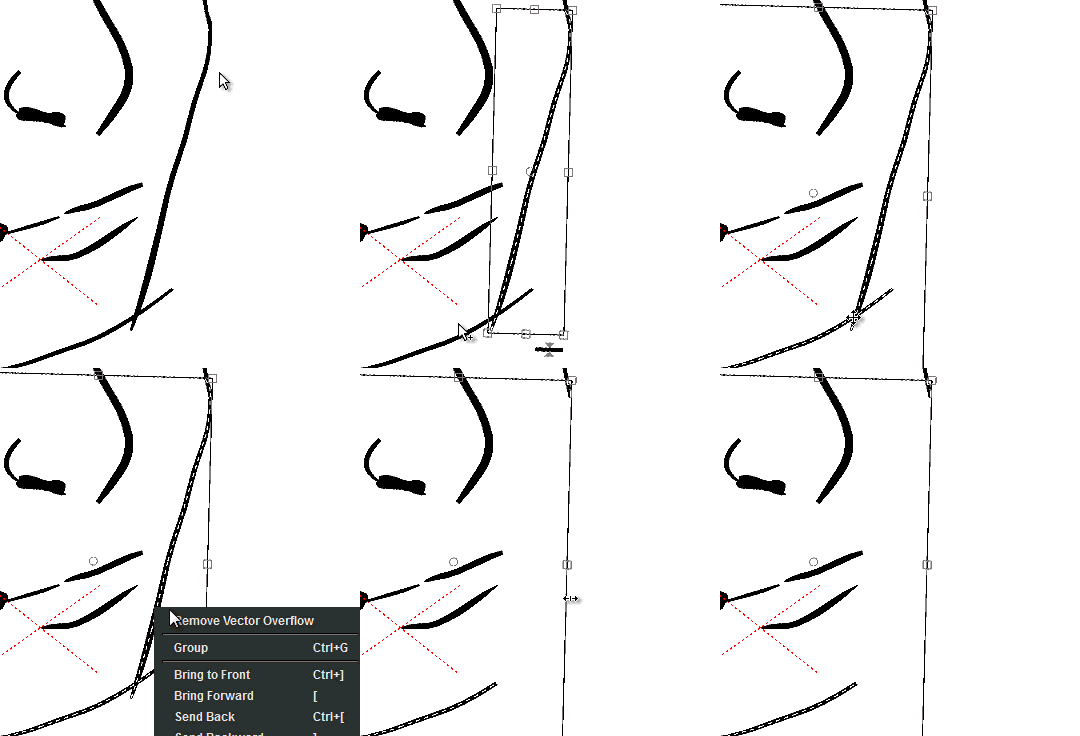 It however hardly works. Very often it does noting at all.In fact almost 80% of the time when you select two overshooting individual lines, nothing happens, or it erases parts of the lines you want to keep.
My suggestion here is to add two new modes to the eraser tool - when you are using it on a vector level. These two modes can already be found in other software such as toonboom, clip paint studio and last but not least - inkscape:
A. Erase up to intersection - This can be found in both Toonboom and clip paint studio. What it does is it erases the lines up to the intersection point - where they intersect with another line. Clip paint studio has it as an eraser tool mode and it works excellently.

Toonboom has two strategies to deal with this. One is the one clip paint uses. But as a second strategy - there is an option in the brush tool - to always create a new node where the stroke you drew overlapped another stroke. From there on it is easy to erase all the nodes exactly to that point and you dont need to move nodes around to get them to overlap. Another strategy with the brush tool is to automatically snap the beginning and end of a line to a closeby node of another line or the line itself (toonboom). Inkscape allows you to continue previously drawn lines - but unfortunately works at the end points of lines and is very limited.
B. Object mode eraser- very often the artist would require to erase entire strokes of a drawing - every stroke is a vector object. Right now in OT you have to go to the select tool, select the strokes and hit delete, then go back to the eraser tool to continue working. In inkscape the eraser tool can also erase entire strokes like this:

The implementation in OT almost never works in practice. It works when you draw a simple square, but when you draw a character and start trying it out - the one in clip paint does the job , while vector overflow in open toonz fails
I wonder how clip paint does it. It's the best one I've seen so far. Strokes there dont create nodes at intersections - so they must be somehow figuring out where the intersecting points are:
Here is my theory
--when the stylus starts a stroke in vector eraser mode:
1. Vector erase stroke collects a list of lines (like inkscape does in example B.) that you touched during the stroke.
1. Vector erase stroke collects a list of lines (like inkscape does in example B.) that you touched during the stroke.
--On release the following happens:
2. Instead of deleting the entire lines (which is an option also), it splits them all up at intersections points (cache result)
3. Using the result from step 2 , It marks the parts of the lines that your stroke has touched and deletes them
4. The lines that were split up (in step 2) are connected again
5. All the lines in the list of lines from step one are deleted and in their place are created the lines created by this operation.
2. Instead of deleting the entire lines (which is an option also), it splits them all up at intersections points (cache result)
3. Using the result from step 2 , It marks the parts of the lines that your stroke has touched and deletes them
4. The lines that were split up (in step 2) are connected again
5. All the lines in the list of lines from step one are deleted and in their place are created the lines created by this operation.
To the user it looks like lines were deleted up to the intersection - just like it happens in the gif of example A .
Anyways, if i knew c++ i would have tried to figure out a way to make this. Hopefully a more experienced programmer will be interested.
So in order to implement a vector eraser mode that deletes lines up to intersections, you will first need to implement a mode in which it can collect a list of all the lines that it has touched.
You get two awesome vector erase modes in one!
Inkscape developers are much closer at achieving this tool, as they posses the main elements.
The default eraser tool mode already collects a list of lines that the stroke has touched.
The 'Cut Path' command can split a line where another overlapped it, it however deletes the line that overlapped it - which is something we do not want in this case!
Krita Developers - Are actually currently trying to collect funding via kickstarter to improve the vector tools in it. There is no statement made in the campaign that they are planning on adding such a mode to the vector eraser. It is not a stretch goal either. But in any case, I found out that some of them are quite aware of this tool in Clip Paint Studio. Whether we see it in Krita or not - only time will tell. It currently needs an entire rewrite of the vector system, but for that to happen they need your help:
If you haven't seen krita yet, feel free to give it a try. Downloads to the latest version are available at the kickstarter campaign page.
OpenToonz - The development of opentoonz is active as I write this, we will see if in the future they improve this feature. In any case, I filed it here #287 in their bug tracker.
Inkscape developers are much closer at achieving this tool, as they posses the main elements.
The default eraser tool mode already collects a list of lines that the stroke has touched.
The 'Cut Path' command can split a line where another overlapped it, it however deletes the line that overlapped it - which is something we do not want in this case!
Krita Developers - Are actually currently trying to collect funding via kickstarter to improve the vector tools in it. There is no statement made in the campaign that they are planning on adding such a mode to the vector eraser. It is not a stretch goal either. But in any case, I found out that some of them are quite aware of this tool in Clip Paint Studio. Whether we see it in Krita or not - only time will tell. It currently needs an entire rewrite of the vector system, but for that to happen they need your help:
If you haven't seen krita yet, feel free to give it a try. Downloads to the latest version are available at the kickstarter campaign page.
OpenToonz - The development of opentoonz is active as I write this, we will see if in the future they improve this feature. In any case, I filed it here #287 in their bug tracker.