I've been juggling a number of projects lately. The animation on piggybank has been in the background and I haven't done much work on it since the last post. The models for the moCap project are ready now and this article will focus on the technical side of things as normal maps are concerned.
There is also a freelance job (a short 2d animation) that took some priority- I just want to make sure it ends up looking very good. :) I wont go into detail about it right now, as it wouldnt be professional to discuss it in early stages, while the client is very much deciding on how it progresses. I am not the type who would release anything I'm working on without the client's permission.
Anyway, onto
normal maps.
It has been my main interest since the first day I started using a 3d package. How do I get a LOT of detail projected onto a low poly mesh. And whats with that obsession with low poly stuff (!?) some might ask. Am I just being a cheap bastard here , with today's technology advancing so quick. :D
Let me state the obvious advantages of keeping your mesh low on polycount- use geometry only where you need it.
- your computer can handle the files, especially if they are part of a giant scene.The files can be used in real time rendering engines. The playback speed while animating is near normal- no need to playblast it a billion times- its a waste of time.
- you can edit the files faster- its easier to edit the overall shape (especially with maya), its easier to paint weights (skinning) when you dont have to deal with a lot of geometry= that equals faster workflow
- You need geometry only to define the silhouette of a character and to define how the character deforms. The details can be achieved through bumpmaps and even better - normal maps. It makes me cry a little, every time I see a model that has been subdivided a million times, has geometry to define cloth wrinkles, face wrinkles,creases/cracks/etc, hair detail, etc etc. Why oh why dont you just make a normal map and bake all that stuff there?
Normal maps are just fancy bumpmaps. Some people convert bumpmaps to normal maps ( not much of a difference there lol). Some people convert textures to normal maps. Want to put some cracks on a rock? There is a photoshop plugin that should do it for you, you can also use xnormal. There is nothing wrong with that- it's just not good enough for something like a next-gen character. While bumpmaps contain information about depth, Normal maps go a step further. They contain information about direction of that depth. So one can have a really low poly character look very very detailed. The only thing that will give it away will be the silhouette of that character.
I know about displacement maps, but I wont go there now :D
So for next gen characters, one basically tells the software to compare the low poly mesh to the high poly mesh and create a normal map for the low poly mesh. Mudbox, zbrush, maya, blender- they all have tools to do that.
Since blender has a special multiresolution modifier for its sculpting mode, it is actually pretty damn good at detailing characters and baking a normal map. It might not be as good at handling giant meshes as zbrush, but its good enough to do the job.
I spent about a week in learning from trial and error about normal maps. For my little experiment, I used the two characters that I made for the moCap module. These guys are pretty much a work in progress and I am not even near pleased at where they are at the moment. Both of them have tangent space normal maps (tangent space is good for meshes that deform, but its a bit more expensive to render than world space, which is good for static objects)
Scarlet Thorn:Scarlet was made almost entirely in zbrush. I made the hi res mesh (detailing) and exported a normal map from it in zbrush. The texture was also made in zbrush.Whats good about Z and I think is one of it's killer features (correct me if I'm wrong but mudbox doesnt have it) are the selection mask modes. Just with a click of a button, Z is capable of masking all the crease areas- that makes it extremely easy for the artist to flesh out detail..
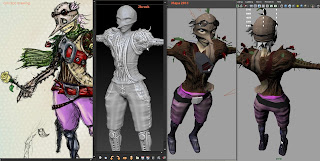
On the screenshot, you can compare how it looks like with detail in zbrush (actual looks) and then how maya portrays the normal map on the low poly object. I didnt show render, because rendering has million of options to tweak and that alone can make it look like anything.
Zbrush flips the map vertically by default. It also left me with some slight edge marks, which I had to clean with the smudge tool in Gimp. That was a bit annoying, but it still got me a decent normal map.
Sepia Baron:I dont have to tell you how much more advance zbrush is at sculpting than blender. But the new blender has some key features that make it worth my time. First of all, its a modelling package that has sculpting capabilities. The brush engine in blender is actually kind of nice.I can do the whole pipeline in it- from modelling the low poly (check metaballs as a nice alternative to zspheres), retopology, uv mapping, detailing (sculpting). Blender can do it all :D. Maya is useless at sculpting- utterly useless... So I sculpted detail of my character in Blender- the
newest build , then I baked it and got out a nice normal map.
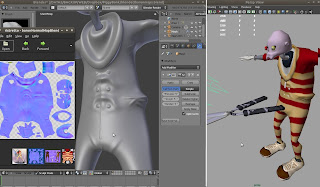
What was surprising about Blender's normal map was- it actually was cleaner than the one I got from zbrush. I know he's a simpler character, but I didnt get anything that needed my attention in gimp.
The only annoyance in blender is that when you subdivide the model, you can really feel the weight. It's probably a good idea to turn off skype while sculpting on subdiv 6. But that is likely to change, when the
unlimited clay modifier gets released in some of the future builds. :D
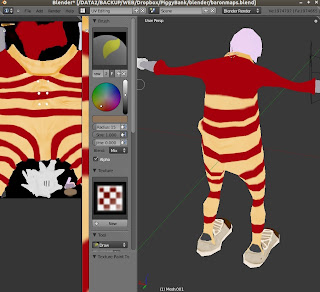
I used the normal map as a basis for the texture, since I wanted to bake some slight shading on the finer detail. The texturing was done completely in Blender+gimp. Its incredibly easy to use them at the same time- blender has a really nice integration with gimp, when it comes to image editing.
Normal maps and rendering engines~ This is pretty much where all the hedaches start for the artist. Different software handles normal maps differently. Maya has three ways of rendering it-
~hardware (viewport) render- seems to display the normal maps without any problems. Note that you should avoid having flipped uv islands- that always offsets the map slightly and creates really ugly seams. I got away with fipped island on the hands and feet, since I wanted to preserve some UV space... but that backfired on me. I needed to go back change the UV of Scarlet thorn in order to get rid of seams. Thankfully zbrush is capable of projecting detail from one mesh onto another (both texture and shape), so I didnt have to redo all that I had.
~Software (maya) render- is absolute rubbish at rendering normal maps. :D I might have missed something. I've tried my best, but not only do I get ugly seams everywhere possible, but its also not very good at representing the hi res detail.
~ Mental Ray render- Seems to be pretty good at normal maps. I got no seams, the hi res detail is pretty good. One thing to note is that it desaturates the textures. I dont know a lot about mental ray. Everything I've posted this far has been rendered with maya's native software render. I dont have the time to learn mental ray, so what I posted now at flickr is as default as it gets.
While still being on the subject of rendering and normal maps, it would be worth
looking into how it works and why there are seams/hard edges in some cases. Blender developers have been hard at work on documenting that and improving the normal map baking magic that happens . It certainly has been a growing interest for me to follow its development and there have been some pretty exciting things happening there-keeping my attention.

 Flipping UV islands is a common way of getting more pixels to cram in detail.
What you do is for each symmetrical part of your model, you take the left side and flip it over the right side.
Flipping UV islands is a common way of getting more pixels to cram in detail.
What you do is for each symmetrical part of your model, you take the left side and flip it over the right side.
 Marvelous provided some really nice realistic cloth simulation which resulted in a good starting point for wrinkles and detail. Bringing the clothing back to Zbrush - I added detail to it - more wrinkles and a zipper here and there, the shoes and shoe laces. The hat, the hands and the respirator mask are all made in blender - where modelling them made much more sense. For the mask I used modifiers heavily. Wireframe modifier was perfect for the cage.
 Naturally the generated cloth mesh had no symmetry. So then when I started doing retopology in blender - the plan started forming more.
For the outfit I will keep the middle part asymmetric, but will reuse the texture space of the sleeves. Same goes for the pants.
His face will be completely unwrapped, but I will reuse uv texture space of the neck, the the cap shade and the shoes.
Naturally the generated cloth mesh had no symmetry. So then when I started doing retopology in blender - the plan started forming more.
For the outfit I will keep the middle part asymmetric, but will reuse the texture space of the sleeves. Same goes for the pants.
His face will be completely unwrapped, but I will reuse uv texture space of the neck, the the cap shade and the shoes. When baking a normal for a target model with flipped islands that overlap their counterparts, you are most probably going to get seams.


